Thursday, October 30, 2014

Applique Painting and Hydrangea Drying...Fall Crafts!

 
Weeks ago I purchased this large, amazing applique from the Purple Pear.  I knew I was going to put it on one of the paneled pocket doors I had sitting in the garage.  I also knew that I would have a lot of fun highlighting all of the wonderful detail with my little paintbrush! 
 
 
 I loved how the applique turned out but I felt like the door itself needed something else.  Well, after living with it in our family room for several weeks now, I have decided that adding anything else would only detract from the beautiful applique.  So, here it is!  It is done!  Finito!
 
 
The Purple Pear has a great selection of quality appliques in beautiful, historic designs.  This one is so large, ornate and heavy!  However, it was incredibly easy to apply!  I used an epoxy glue that I happened to have on hand and it worked perfectly!  I wanted the applique itself to take center stage on my door, and boy does it ever!  The door was painted in Pure White and glazed with a 1:3 mix of French Linen and Artisan Enhancements Scumble product.  The urn was painted in Old Ochre and then I used a variety of colors for the flowers including Old Violet, a mix of Burgundy and Old white and a mix of Olive and Old White.  I highlighted the details on the urn and flowers with Gold Gilding Wax, also purchased at The Purple Pear.
 
 
In addition to painting, I have been having fun with dried flowers on these chilly Fall days!  Drying hydrangeas can be tricky, but I have learned that the key to success is cutting them right at the perfect time!  I cut my own hydrangeas too early this year and they shriveled right up.  A couple of weeks ago, my mother in law and I ran out into her garden and cut all of her hydrangeas.  I brought them home, re-cut the stems and put them into vases of water on my dining table. 
 
 
They have dried beautifully and in the most amazing shades of pink, green, purple and blue!  So, it seems that the trick is to cut them at the right time...later in the Fall, when they are already showing signs of drying on the plant itself.
 
 
Last week I put together a few dried hydrangea arrangements and took them to my booth at Camas Antiques.  These are my favorite Fall decorations this year!
 
I am now looking forward to pulling out the Christmas decorations!  Too soon?  Nah!
 
 
The Holiday Open House at Camas Antiques is coming up in just 2 weeks!  For more details, visit the Event Page on Facebook!
 
Thank you for your sweet visit!
 
Best Wishes and Blessings,
Amanda


Sharing With:
Home Sweet Home at The Charm of Home
Feathered Nest Friday at French Country Home
Show and Tell Friday at My Romantic Home
Treasure Hunt Thursday at From My Front Porch To Yours
 Friday's Unfolded at Nancherrow
 Furniture Feature Friday at Miss Mustard Seed
What's it Wednesday at Ivy and Elephants 
 

Thursday, October 23, 2014

Artful Storage: Retro to Romance Suitcase Makeover


Old suitcases make wonderful and unique storage pieces for anything from craft supplies to treasured mementos.  With a little imagination and a few art supplies, they can be as beautiful as they are useful!  I have painted many vintage suitcases and trunks over the years, most of which I have shared with you here.  This time I decided to forgo my standard striped luggage look for a more artistic, romantic style.  After all, what could be better than a beautiful piece of art that doubles as storage?

 
This makeover started with 2 coats of Antoinette.  Once the paint was completely dry, it was time to get artsy!

 
I love this Floral Scroll stencil from Artisan Enhancements!  Artisan stencils are unique in that they are cut on a thicker, heavier stock which makes them great for creating raised relief designs with products such as VP Antico, Fine Stone and Pearl Plaster.  For this finish, I chose VP Antico, a synthetic polishing plaster by Artisan Enhancements with a neutral base. 
 
 
After attempting and failing at creating stencil reliefs with everything from trowels to kitchen spatulas I finally discovered this fabulous tool called a color shaper from Artisan Enhancements!  It works beautifully for pushing thick product through stencils! 

 
I started by taping the stencil into place with a few pieces of painter’s tape.  And yes, I cut a couple of corners off of my stencil!  It was necessary in order to work around the handle and closures of the suitcase and still be able to lay the stencil flush against the surface.  I scooped some of the VP Antico product out onto a plate and gave it a good stir before slathering it over the stencil with my color shaper.  This product reminds me of a very thick frosting, and applying it feels a bit like frosting a cake.  As soon as I had covered the stencil evenly with the VP product, I lifted the stencil straight up to reveal my beautiful raised design!  Depending on how thickly you apply the VP Antico, it can take up to a couple of hours to dry completely.  I find that this works to my advantage because it gives me time to fix any smudges and even enhance and manipulate the design a bit.


 While the product was still pliable, I used my small paint brush to add a little texture to the design and give it a more custom look.

 
Because I have little patience and always seem to be pressed for time, I hit my VP Antico designs with a blow dryer to speed things along.  I knew this would create a little bit of crackling and I welcomed the additional texture!  Within a few minutes, the reliefs were rock hard and I was ready to move onto the next step!
 
 
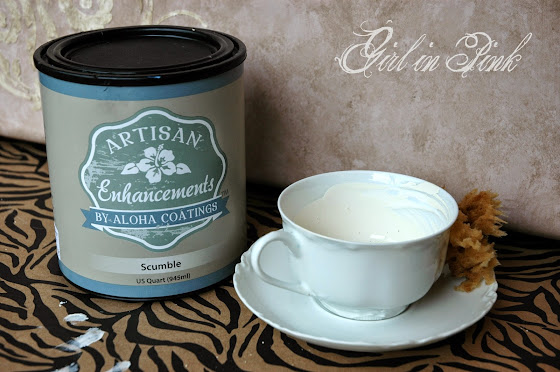
Scumble by Artisan Enhancements is a tintable glaze like product.  I mixed approximately 1 part Coco to 4 parts Scumble to create a soft brown glaze that I then stippled onto my paint surface with a small sea sponge.  I love the silky finish this product has as it dries.
 
 
The Coco Scumble mix really gave my paint finish the antiqued look I was going for, but I wasn’t done with it quite yet!

 
I mixed a second Scumble concoction, this time with Old White and applied it over top the Coco glaze.

 
On the right you can see how the Old White Scumble mix lightened the overall look and gave it another layer of dimension and complexity. 


Once I was happy with the new finish on my suitcase and the Scumble glaze was completely dry (less than 20 minutes!), I sealed it with Artisan Enhancement’s Clear Topcoat Sealer.  This product is a No VOC, exterior grade sealer that dries to a matte sheen.  I used my Topcoat Brush, also from Artisan Enhancements to apply a thin layer over the entire suitcase.  Artisan Enhancements recommends waiting 24 hours before applying a second thin layer for optimum protection

 
The little Samsonite plaque above the suitcase handle popped off easily with a small screwdriver and I happened to have this label frame from the craft store which seemed to be the perfect replacement.  After sifting through some old ephemera for inspiration, I found the word “gratitude” in an old Hymnal and cut it out to put inside the frame.  It wasn’t the word I thought I was looking for but somehow it worked for me.  I like it!

 
Who knew an old, discarded suitcase could be turned into something so lovely and useful?  Think of the possibilities
 
 
I love that I was able to create this pretty piece on a stormy day in the comfort of my warm kitchen without exposing myself to any harmful toxins!  Artisan Enhancements has a wonderful selection of No VOC artistic mediums to take your paint finishes to a new level without the harmful chemicals present in traditional products!

Thank you so much for your visit today!
 
Best Wishes and Blessings,
Amanda


Disclosure:  This is an Artisan Enhancements sponsored post, however the opinions and ideas expressed here are mine and I will only ever promote products that I enjoy using and feel may benefit my readers.

 
Sharing With:
Home Sweet Home at The Charm of Home
Feathered Nest Friday at French Country Home
Show and Tell Friday at My Romantic Home
Treasure Hunt Thursday at From My Front Porch To Yours
 Friday's Unfolded at Nancherrow
 Furniture Feature Friday at Miss Mustard Seed
What's it Wednesday at Ivy and Elephants 


Thursday, October 9, 2014

Brass Chandelier Update: A Whole New Look With Shimmer and Shine!


This little brass chandelier wasn’t turning any heads at the estate sale where I discovered it a few weeks ago.  That was lucky for me because I knew from the moment I spotted it, I knew that I could turn it into something special with my paintbrush and the arsenal of amazing products I had waiting for me at home! 

The unique milk glass bulb decoration inspired me to create a finish with some pretty shimmer and shine that would compliment it well.  In order to achieve the look I was after, I turned to Artisan Enhancements Pearl Plaster and Clear Finish.

 
The first step was to mix the custom color I had in mind for the chandelier.  I started with 3 teaspoons of Pure White and 1 teaspoon of Provence.  I then added 2 teaspoons of Artisan Enhancements Pearl Plaster to give that pretty aqua blue some nice subtle shimmer!  If you’ve never played with Pearl Plaster before, you should know that it is a very versatile and fun product to work with!  It can easily be mixed in with your paint to give your color a pearly finish.  For more dramatic results you can also dry brush it over your paint finish or water it down to create a wash.  It is also absolutely beautiful pushed through a stencil to create a shimmery relief.  To find an Artisan Enhancements retailer near you, visit www.artisanenhancements.com. 

 
Once I had my pearly pale aqua color mixed and ready, I went to work painting the chandelier.  I used a small brush and took my time making sure to cover up every inch of shiny brass. 
 
 
The trick to getting consistent coverage was turning the chandelier around and upside down every so often to be sure I wasn’t missing any areas.  Because the products I use have low to no VOC, I was able to work on this project over the course of a few days right in the middle of my kitchen island.  With three busy children and a family with a very full schedule, this is the only way I am ever able to complete a project!  Even if I have just 20 minutes to spare while dinner is cooking, I grab my brush and paint!
 
 
After 2 full coats and a bit of touch-up here and there, I could no longer see that shiny brass.  Once the paint had fully dried, I was ready to apply a sealer.  For a project like this one, wax is not the best choice as the chandelier bulbs will put off a certain amount of heat which could have an adverse effect on a waxed surface.  Artisan Enhancements has two wonderful products that work great to protect and finish your paint projects, Clear Topcoat Sealer and Clear Finish. 
 
I chose Clear Finish for this chandelier because I wanted a finishing product that would enhance the shimmer of the Pearl Plaster by providing a glossier finish.  Clear Finish is an all natural varnish that protects your painted project and it's easy to apply. 
 
After giving the product a good stir, I applied a thin layer of Clear Finish to the chandelier with my small brush, again moving and turning the piece as it dried in order to get complete coverage.  The key is to apply the product sparingly.  You can see how little product I actually needed on my brush.  A little bit goes a long way!  Artisan Enhancements recommends applying a second thin coat of Clear Finish 2-3 hours after the first. 
 
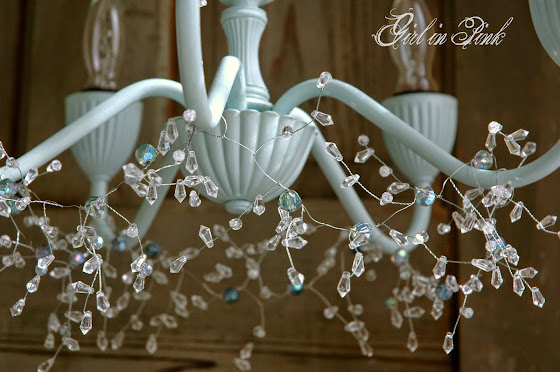
After my second coat of Clear Finish had dried (about 30 minutes after application), I was ready to add some bling to my shimmery blue chandelier!
 
 
A beaded garland purchased at the local craft store was a fun and easy way to give this piece a little more sparkle!
 
 
Before you pass up another out-dated brass chandelier, consider the possibilities! 
 
 
Artisan Enhancements has developed the products to create an unlimited number of beautiful finishes without exposing us or our environment to harmful chemicals!  I think that’s pretty exciting, don’t you?  This little brass chandelier, with it’s lovely new color, shimmer and shine is on it’s way to Camas Antiques where it’s sure to turn some heads now!
 
 
Disclosure:  This is an Artisan Enhancements sponsored post, however the opinions and ideas expressed here are mine and I will only ever promote products that I enjoy using and feel may benefit my readers.


Thank you so much for your visit!  Stop by again soon!
 
Best Wishes and Blessings,
Amanda


Sharing With:
Home Sweet Home at The Charm of Home
Feathered Nest Friday at French Country Home
Show and Tell Friday at My Romantic Home
Treasure Hunt Thursday at From My Front Porch To Yours
 Friday's Unfolded at Nancherrow
 Furniture Feature Friday at Miss Mustard Seed
 What's it Wednesday at Ivy and Elephants

Monday, October 6, 2014

Pretty New Pillow!

Hello!  I am working on a few painting projects that I hope to share soon, but in the meantime I thought I would show off my beautiful new pillow made by very dear friend of mine!

 
I have a hard time finding pretty throw pillows that work well with my décor.  So, imagine my excitement when my very talented friend who sells her pretty stenciled pillows left and right at Camas Antiques, painted one with Chalk Paint® in Antoinette with me in mind! 
 

Doesn't it look perfect below my mirror, also painted in Antoinette?  I adore the chandelier and the saying is "Welcome to our home" in French!  I can't imagine a more perfect pillow for this spot!  Thank you, Denise!  If you live in the PNW and shop Camas Antiques, Denise's space is called La Casa Bella and she sells these beautiful pillows in her booth!  Find her on Facebook too! 

 
I recently pulled out my hot glue gun and had some fun with the flowers I've been drying!  This basket was one of my favorite little projects.  I also did a few small wreaths.
 
 
And here is a peek at one of the painting projects I've been working on.  I think I'm having a bit of a "mental block" on this one!  I love the applique, purchased at The Purple Pear and had such fun painting it.  It's the rest of this piece that isn't working for me quite yet.  Hopefully I will get to a point soon where I am ready to share the whole project!
 
Thank you so much for your sweet visit!
 
Best Wishes and Blessings,
Amanda


Sharing With:
Home Sweet Home at The Charm of Home
Feathered Nest Friday at French Country Home
Show and Tell Friday at My Romantic Home
Treasure Hunt Thursday at From My Front Porch To Yours
 Friday's Unfolded at Nancherrow
Pink Saturday at How Sweet The Sound