Monday, December 22, 2014

Downton Abbey Drawing Room Doors: How to Create Your Own!


If you’re a Downton Abbey fan, you are probably very familiar with this room. As captivating
as the characters and the plot of the show are, do you find yourself distracted by and in awe
of the furnishings and decor in each scene? In this room, the drawing room, it’s those
amazing doors that really make a statement, don’t you think? What if you could create your
own Downton Abbey drawing room doors?


Who says you need to live in an abbey or even have a drawing room to have beautiful doors?
A gorgeous door doesn’t need to be hung on hinges or lead into a room either. It can be a
statement piece in a room, an oversized, unconventional work of architectural art. Don’t you
just love the idea of pretty doors lined up on a big bare wall to display something pretty such
as a vintage gown?


Now that you’re thinking about how and where you might display some drawing room doors of
your own and dreaming about the pretty things you could hang from them, let’s walk through
the process of creating some Downton inspired doors with a little paint and some art mediums
from Artisan Enhancements.
Habitat for Humanity stores and salvage warehouses are great resources for old doors.
These particular doors had clearly been salvaged from a church remodel. There were a
couple dozen of them available at the Habitat store and many had placards on them giving
clue to their origin.
The patina on the hardware of this set of doors was perfect for the project at hand. After a
good cleaning and filling in a few holes here and there with wood putty, they were ready for
the first coat of Old White.


Once that first coat of paint was dry, it was time to map out the relief stencil design for each
door. Just two stencils were used for this entire project, both from the Artisan Enhancements
stencil line.
The next step was to prepare the VP Antico. It’s a good idea to scoop some of the product
out onto a plate and mix it up a bit with a fork before use to ensure even consistency.


This color shaper tool from Artisan Enhancements is ideal for creating raised stencil designs
with VP Antico, Fine Stone and Pearl Plaster.


With the stencil taped in place, the VP product is smoothed right over the top of it, covering
the entire design.


Immediately after completely covering the stencil with VP product, carefully pull the stencil
away to reveal the raised design underneath.


Continue this process all over the doors, in some areas using only part of a stencil and in
others maybe combine different portions to create your own design. When using a stencil
with a fleurish design such as this one, there is no rule that says you must use it straight on, in
whole and without modification. These particular types of stencils are very versatile in that
way.


In the interest of conserving product, always scrape the excess product off of your stencil with
your color shaper in between applications, returning the unused portion to your plate. Rinsing
the stencil at this time is a good idea to ensure that the next design goes on crisp and clean.
As long as the VP Antico has not dried on your stencil, it will rinse off easily with warm water.


After waiting at least a few hours for the stenciled designs to fully dry, brush on another coat
of Old White over the entire door, stencilled reliefs and all.


As soon as your paint is dry, you are ready to accent those raised designs with gold foil from
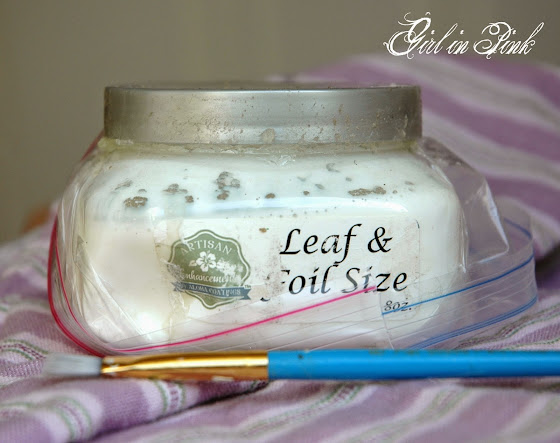
Artisan Enhancements. This poor Leaf and Foil Size container isn’t looking so pretty and new
after being used for several projects, but the sight of it brings some good points to mind that
are worth sharing. This product is extremely sticky, but it needs to be in order to do it’s job.
This particular jar of product has been used a lot and it shows it’s wear. On the other hand,
this little 8 oz. container has completed several projects and will still do several more. Dried
product can gum up around the rim of the container and make it difficult to open. Because the
product is water based, running hot water over the lid for a minute loosens it up enough so
that it opens easily.


Using a small brush, paint the Leaf and Foil Size onto the stencilled reliefs and the edge
moldings of the door. It’s a good idea to work in sections and watch the clock to make sure
each area is given enough time (15-20
minutes) to set up and become tacky before applying
the foils.


Cut sections of Artisan Enhancement’s Soft Gold foil to fit over each stenciled area. Laying it
down, shiny side up over the now tacky Leaf and Foil Size, use your fingers and/or a small
paint brush to burnish the foil.


Once the foil is pulled away, you may see areas where you need to go back and do more
burnishing. Run your fingers over the design to see if there are still sticky areas that you’ve
missed. If there are, simply put an unused portion of the foil over that area and burnish again.


The metallic foils really add something special to the raised stencil relief designs. Artisan
Enhancements offers metallic foils in 8 beautiful colors.


Using your Artisan Enhancements Top Coat brush, seal your doors with AE’s Clear Finish.
Clear Finish is a non-yellowing, all natural varnish that works well with whites and has a satin
to glossy sheen, making it ideal for sealing metallic foil finishes.


This was a big project, but one that makes a big statement. Bring a piece of Downton Abbey
glamor to your home with some gorgeous drawing room doors!

 Disclosure:  This is an Artisan Enhancements sponsored post, however the opinions and ideas expressed here are mine and I will only ever promote products that I enjoy using and feel may benefit my readers.

If you live in the Pacific Northwest, I hope you'll join in the Downton Abbey fun in Downtown Camas on Friday, January 2nd from 5pm - 8pm.  These doors will be on display in the window at Camas Antiques as part of our Downton Abbey theme!  For more details on this exciting event, please visit the event page on Facebook.  


Thank you so much for your kind visit!

I hope you have a Christmas filled with peace, love and contentment!
Best Wishes and Blessings,
Amanda


Sharing With:
Home Sweet Home at The Charm of Home
Feathered Nest Friday at French Country Home
Show and Tell Friday at My Romantic Home
Treasure Hunt Thursday at From My Front Porch To Yours
 Friday's Unfolded at Nancherrow
 What's it Wednesday at Ivy and Elephants 

Thursday, December 11, 2014

Discovered by Fate, Inspired by Downton: A Table Makeover Story


Today I'd like to share a few stories about this special little table...how I happened upon it, why I bought it, what inspired the makeover and where it's headed next!  If you just want the details on paint colors and finish, feel free to skip ahead!
 
So here's the back story on this sweet piece...  One Friday afternoon last summer, after a long morning of disappointing estate sales, I decided to make one last stop before calling it quits and heading home.  The listing read "Farm Sale."  I plugged the address into my GPS and started driving.  It was much further out of town than I had anticipated and I wondered if I was just wasting more gas and time.  When I finally pulled into the field designated for parking, and glanced across to the spot where treasures were sprawled out and a few shoppers were picking through, I began to feel hopeful.  It was a big sale with lots of furniture, a stack of vintage suitcases, a sea of shiny silver plate and all kinds of other little things that make my heart skip a beat!  As I got nearer, I recognized a familiar face.  It was a fellow dealer from Camas Antiques, a very kind woman whom I didn't know well but had visited with a few times during my painting demonstrations at the store.  It didn't take me long to figure out that this was her farm and her treasures that were for sale!  We visited for a moment and then she kindly directed me over to a beautiful little table with the kind of details that make me swoon!  She said that she had previously thought of me and how I could breathe new life into this piece with Chalk Paint®!  She wanted me to take it and told me to name my price!  I was thrilled.  Of course I filled my truck with several other treasures from her sale, but this special little table and how fate brought me to it really left me feeling blessed that day!   
 
 
It wasn't until a few weeks ago that I actually started painting this little gem. For the longest time I really wanted to hold onto it and I knew that if I painted it, it would be on it's way to the shop and sold before I had a chance to enjoy it!  But then, I started making plans to put together a very special window display for the antique store.  And with a vision in mind, I knew what this table was destined for. 
 
 
On Sunday January 4th 2015, the much anticipated season 5 premiere of Downton Abbey airs in the U.S.!  This is my inspiration for the window display, this sweet table and pretty much every other project I've been working on for the past few weeks!
 
I am so excited to announce that in conjunction with the January window display, there will be a Downton Abbey themed event on Friday, January 2nd in downtown Camas!  Check out our event page on Facebook for more details!  If you're local, and a Downton Abbey fan, I hope you'll join me for what's sure to be a lovely evening that will get everyone in the mood for the premiere on Sunday!
 
 
Now, onto the table makeover!
 
 
After 2 coats of Pure White Chalk Paint® had completely dried and given perfect coverage to the once dark table, I added a wash of French Linen to highlight all of those beautiful details.
 
 
    Once I had the wash just how I wanted it and it was dry, I applied a coat of clear wax.  I did not use dark wax this time around as I felt the French Linen wash provided just the right amount of aging.  The last step was to accent the beautiful raised design along the table's edge with French King Gold Gilding Wax, purchased at The Purple Pear.  Because, if it belongs in Downton Abbey, it's got to have some gold on it, right?
 
 
I am loving my gold wings recently purchased at Camas Antiques, the latest addition to my Christmas décor.  They worked well as an accent for staging my special little table today.  When not being used as a photo prop, they hang from the mirror on our mantle. 
 
 
  Here's our precious little Basil dog looking very cozy as he napped beside the tree this afternoon! 
 
Thank you so much for your sweet visit today!  Stay tuned for more Downton Abbey inspired makeovers and news on our upcoming event!
 
Best Wishes and Blessings,
Amanda 


Sharing With:
Home Sweet Home at The Charm of Home
Feathered Nest Friday at French Country Home
Show and Tell Friday at My Romantic Home
Treasure Hunt Thursday at From My Front Porch To Yours
 Friday's Unfolded at Nancherrow
 Furniture Feature Friday at Miss Mustard Seed
What's it Wednesday at Ivy and Elephants 

Tuesday, December 2, 2014

How To Turn Discarded Cabinet Doors into Works of Art!

 
I recently brought home several cabinet doors from our local home salvage store.  I wasn’t sure at the time what I would do with them, but at just a couple of dollars each, I decided I couldn’t pass them up.

Weeks later I found myself dusting those cabinet doors off with the intention of creating some seasonal art to sell in my booth at Camas Antiques using Artisan Enhancement’s Image Transfer Gel.  I discovered a few copyright free vintage images I loved on The Graphics Fairy website and began to devise a plan!


The first step was to choose the images that would fit well on each door.  I emailed the images and the sizes I needed to the UPS store.  I asked them to print a reverse image of the graphics that had text on them.  Image Transfer Gel works only with laser printed images.  Most businesses use laser jet printers, but I learned the hard way that you can’t always assume so.  Be sure to clarify that your images are being printed on a laser jet printer when you order prints for image transfer.

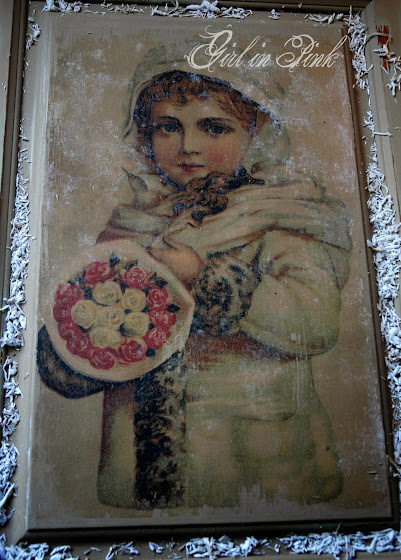
 Once I had my prints in hand, I chose the paint colors for the doors that I thought would best compliment each image.  For the “Winter Girl” that I am sharing in this tutorial, I layered Coco over Duck Egg Blue and distressed the edges before proceeding with the image transfer.

 
I then trimmed the image so that it fit exactly onto the raised part of the door where I wanted it transferred to.

 
With my standard paint brush, I brushed on an even coat of Transfer Gel where I wanted my image to be. 

 
I immediately laid out my printed image, face down onto the wet Transfer Gel, smoothing out any air pockets with my fingers.  Once the paper is completely adhered to the surface, it must dry for several hours.  I find that it works best to let it sit overnight.

 
The next day I wet the back of the paper with a damp sponge and began to carefully and slowly work away the paper pulp with my fingers.
 
 
It’s important to know and remember that the image is supposed to sit on top of the Transfer Gel, so if you rub too hard and rub away the gel, you will also rub away the image.  I strongly recommend practicing this process once or twice on a sample board before attempting to transfer an image onto a surface that you have gone to a lot of work to prepare.  As tempting as it may be, don’t use the scrubby side of that sponge to remove the paper!  Just roll the paper pulp gently with your fingers, and do your best to be patient with this process.  It will be well worth your effort!

 
I took several breaks during the paper removal process, allowing the leftover pulp to dry now and then so that I could see which areas still needed work without going back over places that were complete.  Eventually the image dried and there were no more cloudy white areas. 
 
 
I did end up with a few spots where I overworked the surface and rubbed away a bit of the image.  I actually didn’t mind it and added a bit more of that wear intentionally around the edges to make it look as if the image had been painted on the door ages ago and was naturally worn and distressed. 
 

I decided to do add a little gold to the recessed area of the door to offset and frame my image.  I applied Artisan Enhancement’s Leaf and Foil Size to the areas where I wanted to see the gold.  This product is extremely sticky and not easy to wash out of brushes, so I have designated this small brush specifically for Leaf and Foil Size. 
 
 
After waiting about 20 minutes for the Leaf and Foil Size to set up, I cut a strip of ArtisanEnhancement’s Brushed Gold metallic foil and laid it over the Size, shiny side up!  Let me say that another way, because people have a tendency to do this the wrong way.  Put the dull side of the foil down onto the tacky Leaf and Foil Size. 

I then used a dry paint brush to burnish the foil into place.
 
 
Next, I peeled the foil away to reveal a lovely stripe of Brushed Gold.  Because I wasn’t absolutely precise with the application of the Leaf and Foil Size, I ended up with a bit of gold in a few places where I didn’t want it.  I was happy to find that it wiped off easily with a damp cloth.
 
 
The areas that I wanted to remain gold then needed to be sealed.  I chose Artisan Enhancement's Clear Topcoat because I wanted an overall matt finish on my board.  If I would have been looking for a shinier, glossy finish I would have used Artisan Enhancement's Clear Finish.  With my Top Coat brush, I applied a very thin layer of Clear Topcoat over my entire board, including the transferred image and gold foil.  The following day I brushed on one more quick, light layer of Clear Topcoat and my cabinet door turned Christmas art was complete!

 
Obviously this project could easily be created for any time of year.  In fact, even a laser jet printed copy of an actual photograph could be transferred onto a prepared board for a very unique and special way to display family memories!  What a wonderful idea for a handmade gift!
 
 
I just had to include this piece in my post as well because I loved how it turned out.  This cabinet door needed another element in addition to the image transfer.
 

Using a beautiful stencil from Artisan Enhancements and their VP Antico product, I created a raised relief and accented it with a tiny bit of brushed gold foil.  I walked through the process of creating a relief with a stencil and VP Antico in my Artful Storage post if you would like to read more about that technique.
 
 
This was such a fun project and one I can’t wait to do more of!  With a discarded cabinet door, any laser printed image and a few great art mediums from Artisan Enhancements, you can create your own unique work of art!  Consider the possibilities! 
Now, go create something beautiful!

 Disclosure:  This is an Artisan Enhancements sponsored post, however the opinions and ideas expressed here are mine and I will only ever promote products that I enjoy using and feel may benefit my readers.
 
Thank you so much for your kind visit!
 
Best Wishes and Blessings,
Amanda


Sharing With:
Home Sweet Home at The Charm of Home
Feathered Nest Friday at French Country Home
Show and Tell Friday at My Romantic Home
Treasure Hunt Thursday at From My Front Porch To Yours
 Friday's Unfolded at Nancherrow
 What's it Wednesday at Ivy and Elephants