Thursday, April 23, 2015

Sweet Petite Vanity


I've said it before and I'll say it again, I adore vintage vanities.  Everything about them just exudes vintage glamour and romance!  I discovered this very petite piece buried under boxes in a woman's garage where I was picking up another piece of furniture a couple of weeks ago.  I asked her if it was something she was planning to sell, to which she replied yes!  Lucky me!


To the body of the piece I simply applied two coats of a custom mix of 1 part Old White to 1 part Paris Grey.


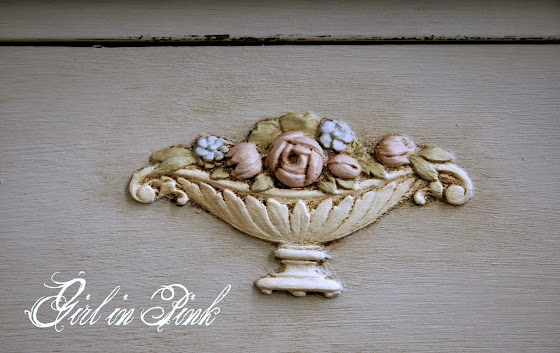
The beautiful appliques which were all but lost in the original dark wood finish were painted out with a small brush in Old White, Antoinette, Louis Blue and Versailles.  Now they take center stage against the soft, neutral grey background.


After some light distressing with a fine grit sanding sponge, the entire piece was waxed first with Annie Sloan's Clear Wax, followed by a bit of Dark Wax here and there.


I used my waxing brush to get the Dark Wax into the crevices of the appliques to really make them look as though they were painted a century ago and left to weather and collect dirt!


This petite vanity now sits sweetly in my booth at Camas Antiques, waiting patiently for someone to take it home with them.

Thank you so much for your visit!

Best Wishes and Blessings,
Amanda


Sharing With:
Home Sweet Home at The Charm of Home
Feathered Nest Friday at French Country Home
Show and Tell Friday at My Romantic Home
Treasure Hunt Thursday at From My Front Porch To Yours
 Friday's Unfolded at Nancherrow
 Furniture Feature Friday at Miss Mustard Seed
What's it Wednesday at Ivy and Elephants

Friday, April 10, 2015

Create Charming Patina in Just a Few Easy Steps!


This outdated oak hutch from the 1990’s had the shape and structure of the sought after
primitive possum belly cabinets. What it lacked was the charming patina that is often found
on those older pieces, the ones pulled out of century old farmhouse kitchens. Recreating that
chippy, crackled paint finish couldn't be easier with Artisan Enhancement’s Crackle Tex.
Here’s how…


Crackle Tex is a one step crackle process that not only creates a great crackle effect but can
also be lifted off or chipped away to offer a truly authentic looking aged finish.
Remember that when applied, it will crackle to show the finish underneath, so you have the
option of painting a base coat that will show through your cracks or apply it directly onto an
original wood finish as was done on this cabinet. After a simple cleaning with a damp, soapy
rag, a generous coat of Crackle Tex was applied all over the entire piece.


Once the Crackle Tex medium was dry to the touch, one coat of Duck Egg Blue was applied.
The paint reactivates the Crackle Tex quickly, so it is important to brush it on swiftly and not
overwork the surface. 

If you need to go back and touch up an area, wait until your paint has
completely dried before doing so. If you want more crackle in an area, touch up that area with
a bit of Crackle Tex first, allow it to dry and then paint just that section, using a light hand so
that it blends in with the rest of the surface.

This finish is especially forgiving in that it is meant to look imperfect and rustic, but it’s also
nice to have some control over where and when the imperfections occur.


Brushing your paint on in a direction perpendicular to the direction you brushed your Crackle
Tex in will give you a more dramatic, all over crackle as opposed to the linear effect achieved
by brushing both paint and Crackle Tex on in the same direction.


While your paint is drying and you are watching cracks begin to appear, take a damp sea
sponge and pull the paint off in spots where you want to see heavier distressing. You can
also come back and distress with sandpaper later on, but the “pull off” Crackle Tex method
could essentially save you that step altogether!


New, heavy iron hardware was purchased for this cabinet and painted in Old White, lightly
distressed and then sealed with Clear Topcoat Sealer.


The glass panels were replaced with chicken wire to add to the primitive look of the piece and
the interior was painted in Old White.

Clear Topcoat Sealer by Artisan Enhancements is a non-yellowing, natural soya based sealer
that dries clear with a matte sheen. It will occasionally take on a yellow or brown hue when
applied over white paints. If this happens, it is not the sealer, but a pigment in the wood grain
or stain that lifts up through the paint and bleeds through. There was no issue with bleed
through or staining on this oak cabinet. The Clear Topcoat Sealer did not change the pigment
of the Old White paint here at all. If you are working on an older piece, especially if you plan
to paint it white and are concerned about bleed through, seal it with Clear Topcoat Sealer
before you begin. This will save you from having to deal with any staining or bleed through later on.


As soon as the paint had dried, the entire cabinet was sealed with 2 thin coats of Clear
Topcoat Sealer. Working in sections, at least 24 hours of dry time was allowed between
coats. The sealer provides a beautiful matte finish that will insure that the cabinet’s new
chippy, crackled look will be water resistant and durable for many years to come.


Creating a new finish for a piece as large as this cabinet might seem overwhelming but with
the right products, it isn't as time consuming and difficult as you might think. With just 1 coat
of Crackle Tex, 1 coat of paint and 2 coats of Clear Topcoat Sealer, this outdated oak cabinet
was given a charming, aged patina reminiscent of an old country farmhouse kitchen!


Thank you so much for your visit!

Best Wishes and Blessings,
Amanda


Disclosure: This is an Artisan Enhancements sponsored post, however the opinions and ideas expressed here are mine and I will only ever promote products that I enjoy using and feel may benefit my readers.


Sharing With:
Home Sweet Home at The Charm of Home
Feathered Nest Friday at French Country Home
Show and Tell Friday at My Romantic Home
Treasure Hunt Thursday at From My Front Porch To Yours
 Friday's Unfolded at Nancherrow
 Furniture Feature Friday at Miss Mustard Seed
What's it Wednesday at Ivy and Elephants

Thursday, April 9, 2015

Farmhouse Kitchen Workshop Window


I have had the pleasure of occupying the small window at Camas Antiques once again!


Inspired by Spring, I pulled together some of my favorite Chalk Paint® colors for a soft and cheerful palette.  Duck Egg Blue, Antoinette, Paris Grey, Paloma, Versailles and Old White all play important roles in this dipslay.  Each piece has a hang tag labeling the colors and products used.


The possum belly style cabinet that takes center stage will be the focus of another blog post coming soon, so stay tuned!  It was a fun piece to do and not nearly as overwhelming a project as one might think!

Thank you so much for your visit today!

Best Wishes and Blessings,
Amanda

Friday, April 3, 2015

How to Create Beautiful Finishes on Flower Pots and Seal Them for Outdoor Use!


With the Spring season underway, it’s time to start thinking about adding color and beauty to
our outdoor living areas. Why not create some custom painted flower pots for your porch or
patio? Here’s a little inspiration to get you started and the lowdown on what products to use
to make sure that your paint finish holds up outdoors for months to come!


Terra cotta pots are great blank canvases for outdoor art. For this project, 3 various sized
pots were painted, one in Antoinette, one in Paris Grey and one in Duck Egg Blue.


Once the paint was completely dry, Fine Stone, an exterior grade plaster product with
aggregate texture from Artisan Enhancements was pushed through a small portion of their
large format Venetian Damask stencil.


Creating a raised stencil relief like this one on a curved surface can be a bit tricky. It helps to
tape the stencil down. Use a color shaper tool to smooth the Fine Stone across the stencil to
make the design go on evenly. As soon as you have covered the area of the stencil you want
to appear on your pot, lift the stencil straight up off of the surface. Your stencil will clean off
easily with water and a soft rag if you take care of it while the Fine Stone is still wet.


Drying time on the Fine Stone varies depending on how thickly you have applied it but it
should be completely dry within a few hours. To create an aged patina, apply a thick layer of
Artisan Enhancements Crackle Tex all over your pot and allow it to dry before proceeding.


Once the Crackle Tex has dried, a second paint color can be applied. Here, Old White was
brushed on thickly. When painting over Crackle Tex, it is important to not overwork
the surface as the crackle medium will start to activate quickly.


As soon as the cracks begin to appear, you can begin to remove areas of the top layer of
paint with a damp sea sponge. Distress as much or as little as you like until you are pleased
with the overall look.


As great as this finish looks at this stage, one more step will add additional depth to the
design.


Artisan Enhancements Scumble tinted with a French Linen/Old White mix was used to create
a glaze to further age and enhance the patina of the 3 flower pots. Five parts Scumble to one
part paint was the ratio used for this step. The glaze was brushed on and then wiped back
with a damp sea sponge.


After giving the Scumble glaze around 40 minutes to dry, you can proceed with sealing your
pots for outdoor use. Artisan Enhancements Clear Topcoat Sealer is an eco-friendly
exterior grade sealer. Use a quality brush such as Artisan Enhancement’s Topcoat brush to apply a
thin layer on both the exterior and interior of the flower pot. The pot’s interior should be
sealed to insure that once planted in, nothing from the soil will seep through the porous clay
pot and effect the paint finish.

Note the minimal amount of sealer on the brush in the photo above. A little goes a long
ways!


At least 2 thin coats of Clear Topcoat Sealer should be applied, giving the first coat ample
time to cure before applying the second. Twenty four hours is recommended.


Once your pots are painted, stenciled, crackled, glazed and sealed, the creativity doesn’t
have to end there! Consider stacking varying sized pots for a tiered display. Once these
three were filled with potting soil, a dowel was pushed down through the centers to hold them
in place.


The dowel was then trimmed down and a half flat of white Alyssum was planted in the top pot
and around the edges of the bottom two.


Though the flowers may wilt in the sun or die back come winter’s frost, with Artisan
Enhancements exterior grade Clear Topcoat Sealer, the new finish on these flower pots will
still be beautiful come time for next year’s plantings!


Thank you so much for your visit!

Best Wishes and Blessings,
Amanda


Disclosure: This is an Artisan Enhancements sponsored post, however the opinions and ideas expressed here are mine and I will only ever promote products that I enjoy using and feel may benefit my readers.


Sharing With:
Home Sweet Home at The Charm of Home
Feathered Nest Friday at French Country Home
Show and Tell Friday at My Romantic Home
Treasure Hunt Thursday at From My Front Porch To Yours
 Friday's Unfolded at Nancherrow
 Furniture Feature Friday at Miss Mustard Seed
What's it Wednesday at Ivy and Elephants

Thursday, April 2, 2015

Ready for Spring!

 
Happy Spring!  This is my absolute favorite time of year!  I thought I would just share some photos today of my booth all full and ready for the birthday sale last month at Camas Antiques.  I am so glad that I took photos when I did because most of what you see here is long gone.  The good news is that I have been busy painting up a storm and am going to have lots of makeover projects to share very soon, along with a couple of fun tutorials.  So...stay tuned!
 
 
Last month I did a little Easter crafting and made some pretty tags that I tied to colorful baskets.  A few are still available in my booth.
 
 
I had two of these lovely nightstands that I simply painted in Old White, lightly distressed and then sealed with clear wax.  They were sold the day after I delivered them to my booth!
 
 
Aren't these little vintage lawn dresses the cutest?  I discover them here and there, carefully soak them in a special linen wash, lay them out to dry and then iron each one.  It is quite a process, but I enjoy it and they look so sweet displayed on a pretty wall rack.  Most of the ones I took in for the sale have sold, but I just added a few more to my booth and hope to continue to find more to offer for sale.
 
 
I have also been adding more beautiful vintage slips and nightgowns to my pink wardrobe!
 
 
For anyone in my area interested in workshops, here is our schedule for April at Camas Antiques.  I would love to have you join me for one or both of these fun evenings this month!
 
Thank you so much for your sweet visit!
 
Best Wishes and Blessings,
Amanda


Sharing With:
Home Sweet Home at The Charm of Home
Feathered Nest Friday at French Country Home
Show and Tell Friday at My Romantic Home
Treasure Hunt Thursday at From My Front Porch To Yours
 Friday's Unfolded at Nancherrow
 Furniture Feature Friday at Miss Mustard Seed
What's it Wednesday at Ivy and Elephants