Wednesday, October 13, 2010

Coffee or Tea-Staining

Lacy headband...my one crafting accomplishment for the day.

So, I finally have one of those luxurious days where no one has to be at any certain place at any one time, the majority of the laundry is done and the house is relatively clean.  Yes, the perfect day to finish up projects and do some crafting!  Lovely!  Only, for some reason when I have a day like this...I don't know where to start and I end up wasting a lot of time walking from one room to another just staring at things, pulling fabric, ribbon and lace out of my craft closet and scheming...not crafting.  I did make one headband today...but I don't consider one headband a sufficient use of the hours of available time I've had.  I should note that I do have 2 little boys to tend to and play with...so it hasn't been hours of time completely devoted to crafting...just more time than I am used to having!  I thought maybe if I did a brief tutorial-type post I would feel better...like I had accomplished something creative, and something I had been meaning to do!  So, I am putting my unproductive craft scheming aside to discuss fabric staining. 

I am in love with the color combination of rose pink and linen cream...especially when it comes to lacy things!  I had this lovely rose pink lace that I thought would make a pretty bow for a headband...
Unfortunately when I poked around my crafting supplies, all I had was white ribbon and lace to go with it...nothing creamy like I'd imagined.  On a recent trip to the fabric/craft store, I ran into a similar problem.  I searched for the right cream ribbons and found nothing but bright white in the design I was looking for.  I have recently discovered that the solution is simple...grab the white and stain it for the perfect vintage cream!  Tea-staining is nothing new, in fact it is one of the oldest fabric dying methods.  For more detailed information on the tea-staining process, follow this link to a great, more in-depth article:  How to Tea Stain Fabric  My method is much more simplified and to be perfectly honest, I don't use tea!  You see, every morning I make a pot of coffee...my husband fills his travel mug and I have one cup.  This leaves us with a few extra cups sitting in the pot at the end of the day.  So...when I have fabrics, ribbons or in this case lace that I want to stain, I use the leftover coffee.  I have used tea as well, and I have found that a cup of brewed black tea produces the same results as a cup of black coffee.  I simply use the coffee because it seems to be brewed and ready when I need it.  The following is my "coffee-staining" method:
Put your fabric in a big metal pot.  Poor 3-6 cups (the more coffee you use, the darker the resulted color) of brewed hot black coffee over the fabric.  Dilute with a bit of warm water and make sure that the fabric is completely submerged.
Stir your fabric a few times to ensure even staining.  Let stand at least 5 minutes.  Know that the longer you leave your fabric in the coffee, the darker it will be.  I don't usually leave my fabrics for more than 10 minutes because I like the creamy off-white color rather than the darker tan.  Once you've pulled your fabric out of the coffee, rinse it in cold water.  You'll see some of the new color wash away with the rinse, but rest assured that it is stained and will dry darker than it looks at that moment.

Once you've rinsed your fabric, you'll need to find a good place to hang it to dry.  As you can see, my old stripped lampshade comes in handy for me once again!
I took this photo to show the before and after of the coffee staining process.
 A couple of precautions...if the fabric you are staining has a pre-existing stain, the coffee or tea staining process will make it more prominent.  Know that your fabric will take on the fragrance of the coffee or tea that you use...so either use the method that produces the most appealing scent to you, or be prepared to pull out the febreze or perfume to mask the coffee or tea smell that disagrees with you.  Either way, the smell will dissipate over time.  If you are staining something that will be washed frequently, the stain color will fade with each washing...but you can always stain it again if desired!

Have fun experimenting with fabric dying...the possibilities are endless!  Remember, you are not limited to the colors you find at the fabric store.  Also, think twice before discarding a table linen, dresser scarf or pillow sham...maybe all it needs is to be aged with the simple process of tea or coffee staining!
Thanks for stopping by!  Best wishes and God bless!


Monday, October 11, 2010

What a Difference a Frame Makes!


Just a quick post to share one of those "meant to be" pairings.  I picked up this adorable print a couple of months ago at a thrift store.  It's titled "Suspense" and is by Charles Burton Barber, painted sometime between 1845 and 1894. 

As I am sure you've already guessed, I love the little victorian girls especially when they are surrounded by cute little furry or feathery creatures!  Unfortunately this sweet print was in a very outdated oak frame and surrounded by an army green and burnt orange matting (so not my colors).  Typically a few coats of cream paint will update a frame enough for me to call it re-styled and sweetened up, but this little girl was just begging for something more elegant!  One of my purchases last week was an empty frame...I bought because I liked the style and the color and the price was just right-on!  I had no idea it would fit this sweet print I had been holding onto...but it did!  Unfortunately it didn't come with glass in it (part of why the price was so nice)...and it was a smaller size than the frame the print was in originally, so I couldn't steal that piece of glass.  I poked around the garage a bit and just happened across THE perfect piece of picture frame glass (rescued from the recycling pile...just in the nick of time!)  Get ready, wait for it...

"Before"  Blah!


 "After!"  Tada!
What do you think?  Quite the difference, huh?  She went from tired old 80's victorian to 2010 Romantic Chic in a matter of minutes!  I love it when things come together so perfectly!

Sunday, October 10, 2010

Weekly Words To Live By...

“For beautiful eyes, look for the good in others; for beautiful lips, speak only words of kindness; and for poise, walk with the knowledge that you are never alone.”  Audrey Hepburn


For more wonderful "Weekly Words to Live By" visit: Notes From a Cottage Industry

A Successful Day of Treasure Hunting!


Last Thursday morning my mom watched the boys so that I could spend a few glorious hours doing what I love to do...hunting for treasures!  I met a sweet friend (and fellow dealer) at a rummage sale first thing.  As usual, I didn't get there as early as I had planned...and as usual this dear friend was holding a spot for me near the front of the line!  Thankfully no one behind us seemed to notice, or care that I had take cuts (I still felt guilty!)  We had a nice visit while we waited for the doors to open and then we split up to seek out the goods!  This particular sale is one that is held twice a year and I've missed it only once in the last 5 years!  In fact, the second time I went I had to bring my husband along to sit in the car with our 2 week old son while I shopped!  I was still recovering from the c-section and was pretty limited on time in between feedings, plus my hubby had to get to the office, but I was determined to make it to that sale!  Unfortunately it seems that the pickings are getting progressively less while the prices increase, but it's still a fun sale...and you never know what you'll find!  Once I felt I had explored every corner of the rummage sale, I hit up a couple of my favorite thrift stores...and added to my loot!  By the time I needed to head home to relieve my mom, I had quite the truck-load of goods!  As promised...here are a few pictures of what came home with me last week. 
I feel like I hit the mother-load on the silver pieces!  I can't wait to add all of these lovelies to my display this week!  I have never brought home so many fun and fancy pieces after just one shopping trip!  Ooooh-la-la!
I am slightly obsessed with Beatrix Potter these days!  I rarely pass up one of those sweet little stories when I come across them...and as you can see, I came across quite a few of them last week!  I did have to pass on one which was very sad as it was one that I have been searching for for my boy's collection, "Ginger and Pickles" but all of the pages were stuck together...really stuck!  So sad!  I was very pleased to find the complete box set (1-12) in perfect condition (I am putting it aside for Christmas, for a certain little niece and nephew of mine who are missing these classics from their collection!)  The rest will go to the shop this week, along with a really neat vintage edition of "The Wizard of Oz" and sequel. 
I am sucker for vintage lace, linens, doilies and especially needlepoint!  It's hard to tell in this photo, but the pillows are battenburg lace.  They will most likely end up on our bed...just the accents I've been looking for!  The tapestry fabric was bundled with a sticker that said "scraps."  I wasn't expecting much but when I opened it up at home I was thrilled to find that there were in fact several good sized pieces...enough to make a couple of bags or upholster some dining chairs! 
Isn't this a beautiful needlepoint?  Just imagine the hours of work that went into it...a piece of art for sure!  I am thinking it will make a lovely throw pillow...maybe for my sofa, or maybe for the shop...we'll see!
You could say I have a thing for pearls!  I just love how a grouping of them looks, so elegant, so effortless and feminine!  I am working on tagging these beauties to take to the shop tomorrow night to add to my "dress-up" display!

Thank you for stopping by!  Best Wishes and God Bless!

Tuesday, October 5, 2010

Creamy Painted Furniture and a "Dress-Up" Trunk

I found the perfect color of cream paint this weekend!  It reminds me of rich french vanilla bean ice cream!  I finally got busy and painted a few pieces of furniture and took a load of treasures to the shop last night.  I thought I would share some photos of my most recent projects...


A couple coats of cream paint, a little distressing, decoupaged french toile fabric, new (antique) pulls and this bedside table is ready to add some romantic charm to the boudoir! 

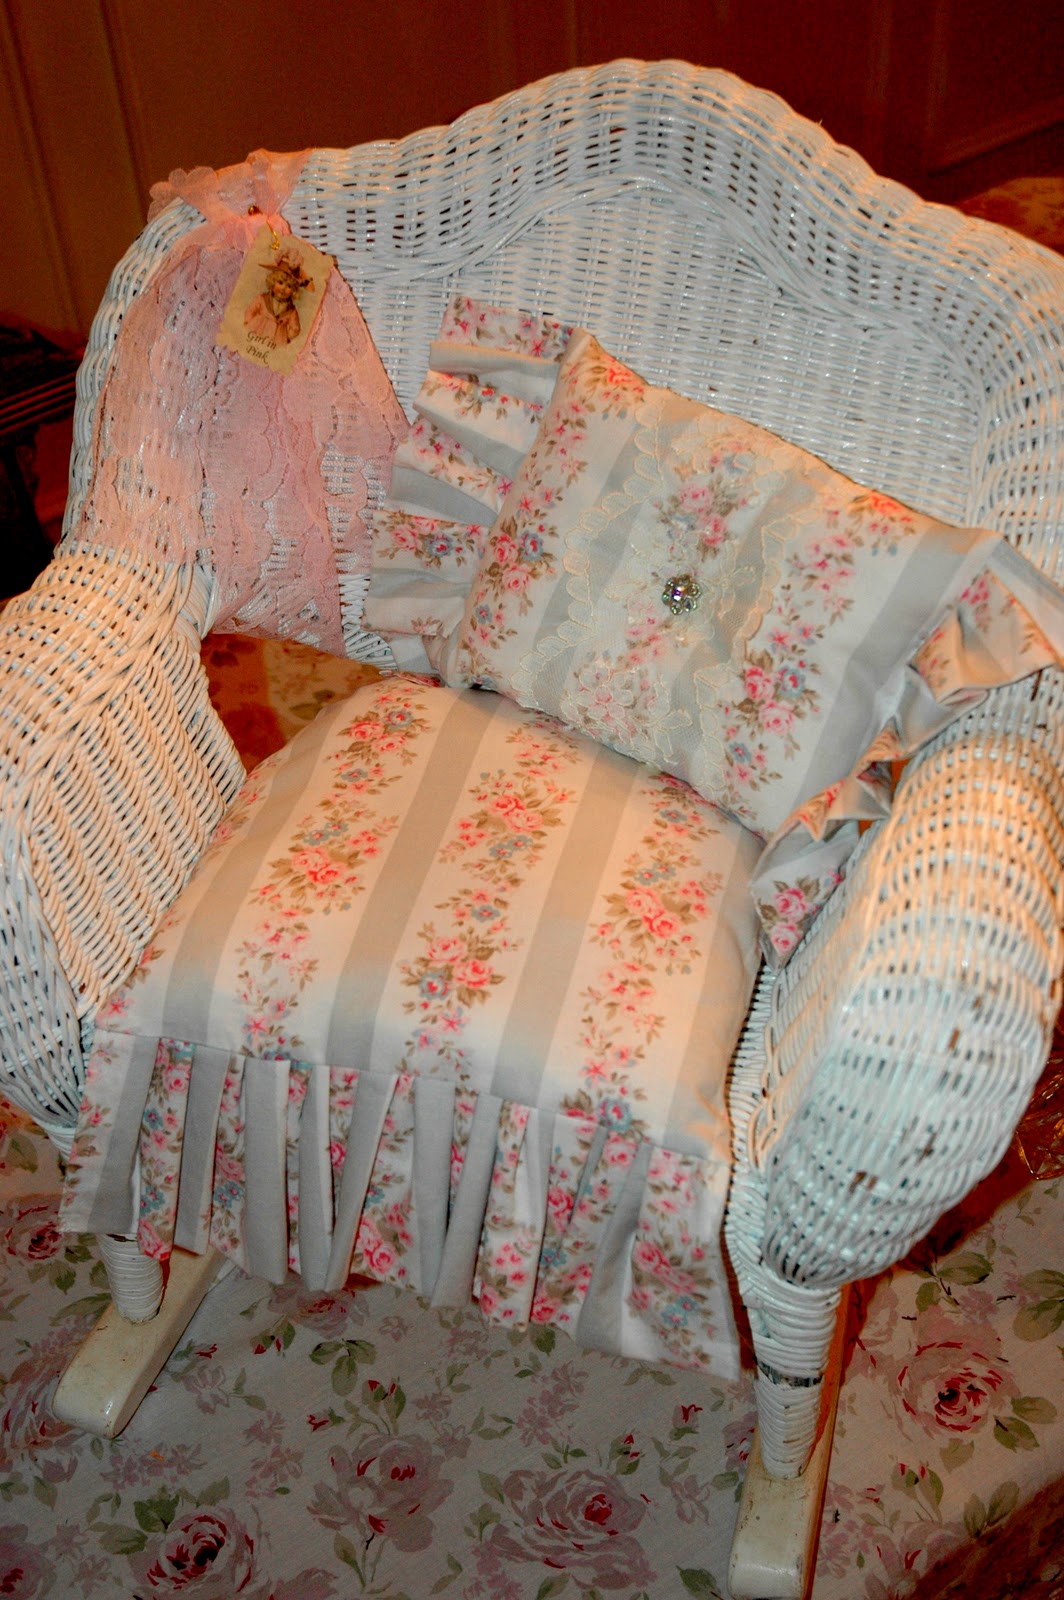
I pulled out the sewing machine Friday night and made a cottage chic cushion and pillow for this sweet little wicker rocker.  A vintage rhinestone button was the perfect finishing touch on the ruffled pillow!  I know, I know...I need a little girl!  For now, I am happy creating things for other people's little girly girls!


This adorable vintage dresser took on a new life with that pretty cream french vanilla paint!

I didn't paint this charming tiered table...it is still sporting it's original chippy cream and gold treatment and I really love it just as it is.


I put this "dress-up" trunk together with all of my little girly shoppers in mind!  It is stocked with vintage hats, little white gloves, an old lace parasol, and a wire bust dripping with beaded necklaces and clip-on earrings!  I have much more to add to this display, but ran out of tags and time yesterday!
Check out this fun old flowery hat!
That's it for now!  I plan to do some house cleaning and baking tomorrow...then on Thursday, a shopping day!  I'll look forward to sharing what treasures I find with you then!  Thanks for stopping by!

Wednesday, September 29, 2010

Almond Sugar Cookies, a Family Tradition

Acorns!

I have been on a baking spree over the last couple of days, and I thought I would share a favorite family cookie recipe this evening.  The almond flavor adds a classy twist to the traditional sugar cookie.  These are the cookies my mom baked most often when I was little.  We had a collection of cookie cutters to fit every season/holiday.   I have fond memories of sitting at the kitchen table with my dad, frosting and decorating these cookies for hours!  My dad would spend 30 minutes on one cookie...creating a confectionary masterpiece, to be devoured in 30 seconds.  Over the past several years I have put together my own collection of cookie cutters...a lot of holiday and a bit of randomness too!  My boys love helping make these, especially the frosting part but they also get a kick out of digging through the cookie cutters.  Usually we do something that relates to an upcoming holiday but sometimes I let them get extra creative and we have flamingo or elephant cookies!  ;)

Almond Sugar Cookies

Ingredients
3/4 cup butter (softened)
1 cup sugar
2 eggs
2 tsp almond flavoring
2 1/2 cups flour
1 tsp. baking powder
1 tsp. salt

Directions
Mix butter, sugar, eggs and almond flavoring.  Add baking powder and salt.  Mix well.  Add flour, mix well.  Chill for at least 1 hour.  Bake at 400 for 6-8 minutes after rolling dough to 1/8" thick and cutting into desired shapes.

Frosting
I don't measure when making frosting...just beat butter, powdered sugar and a little vanilla until soft peaks form.  I add a couple teaspoons of cocoa powder to make chocolate frosting.

Enjoy!

Tuesday, September 28, 2010

Shop Photos...

As promised, here are a few photos of my Autumn display at the shop.  It doesn't look exactly the way I had hoped but I am sure I'll get there after a couple more Monday nights of tweaking and fluffing.  It will surely come together just about the time I am ready to pull out the Christmas decor, lol!  Now, to put my house back in order after several days crafting...

Thank you for stopping by!  -Amanda