Thursday, September 29, 2011

Fall Mantel - Easy Book Page Leaf Garland

Hello friends!  I hope you are having a fabulous week!  I have been busy...having a little fun around the house!  Putting together a Fall look for my shop space last week, and perusing all of the amazing projects and inspiration in Blogland has motivated me to do a little seasonal decorating at home.  In past years I haven't done a lot of Fall decorating...I tend to skip the Halloween and Thanksgiving decor and go straight to decking the halls!
  I started with the family room mantel, removing my usual pale pink accents and trading them in for darker burgundy and brown tones.  I am still having fun with the coffee-stained paper leaves, and this time around I used pages from a (boring) book instead of sheet music. 
If you missed my simple tutorial on making the aged, scented book page or sheet music leaves, you can find it hereThey are easy, cheap and fun to make!
Here is how I made my book page leaf garland:
For a 6 foot garland, take 35-40 aged, dried book page leaves and run them through your sewing machine, overlapping and alternating their direction as you go.  What you end up with is a 2-dimensional length of leaves sewn together.  To get the 3-D look you see here on my mantle, secure one end where you want to hang your garland, and start twisting (like crepe paper).  Once you have a look you like, secure the other end.  Voila!
I am really enjoying my new Fall family room decor!  Somewhere in the attic is a box of ceramic orange pumpkins and leaf platters that I haven't been motivated to dig out.  Now I don't feel like I need to!  The orange has never really worked well with the colors in our home.  I love this warm, muted palette and I am looking forward to spreading it throughout the rest of our home for the Autumn months ahead! 
Sometime soon I am going to grab a can of that heat-safe black paint I keep hearing about and do away with the awful awful brass detail on our fireplaces!  It's on my super long list of projects to conquer!  What I wouldn't do for a few more hours in the day!
Thanks so much for your sweet visit today!  I so appreciate you taking the time to stop in and share your thoughts!  I know how busy everyone is and I just thought I'd tell you how much your comments mean to me! 
This weekend I'll be putting the finishing touches on my plans for my window display at Camas Antiques which I will be setting up the first part of next week!  This is the BIG project I keep mentioning!  I am super excited and a little nervous but can't wait to share it with you!  I've been collecting and storing bits and pieces for this display for months now and I think I am just about ready to pull it all together and unveil the vision!  Stay tuned my friends!
 
Have a wonderful weekend!
Best Wishes and Blessings,
Amanda


I will be joining in on the following parties:
Vintage Inspiration Friday at Common Ground
Show and Tell Friday at My Romantic Home
Home Sweet Home at The Charm of Home
Feathered Nest Friday at French Country Cottage
Potpourri Party at 2805
Thrifty Things Friday at The Thrifty Groove
Frugal Friday at The Shabby Nest

Tuesday, September 20, 2011

Scented, Aged, Sheet Music Leaves Tutorial

Hello Friends!  Remember me?  I feel like I should apologize for being so absent from the blogging world lately!  I hope you'll forgive me!  Other things have taken priority and I am pretty sure most of you can relate!  Life is busy and every now and then something has to take the back burner!  I'm not about to give up on blogging though!  I've been working on a big project (big for me anyways!) and I am really looking forward to sharing it with you soon!  So stay tuned! 

The few rainy days we had here in the Northwest this last week put me in the mood to do a little crafting!  These aged sheet music leaves were simple to make.  I had all of the supplies on hand and I think they add a nice touch of Fall to my shop display!  They are just as charming made with book pages or computer printed images!  Just keep in mind that you'll probably need to use a laserjet printer if you're going to print your images.  Images from my inkjet printer run right off the paper when I get it wet.  I don't know much about printers...is that the printer or the cheap ink I buy?  Anyhow, I had a lot of sheet music on hand and I am liking how these turned out!  Here is how I made my pretty Fall sheet music leaves.
I started by tracing a leaf cookie cutter I had, but you can make a template with a computer image which would work just as well.  I found that I was able to cut through 5 sheets of paper at a time.
These sheet music leaves were far too crisp and white as is to work with the antique look I was going for, so I used the same aging technique I have used for lace, ribbon and doilies in the past.
I spread the leaves out in a shallow pan and poured the leftover coffee that had been sitting in the coffee pot over them.  Whether the coffee is hot or cold doesn't seem to make much of a difference.  Just be sure to have some tongs ready if you're working with hot coffee!  I let these soak for about 30 minutes or so, poking them down now and then when they start to surface.  I like to vary the length of time each batch soaks.  The longer the leaves sit in the coffee, the darker they will be.  Its nice to have a variety of different colored leaves to work with.  Next, I transferred them to a clean cookie sheet.  I have a couple of dollar store cookie sheets that I use solely for crafting.
Here is where I think it's important to know your oven.  Mine tends to run a little low in temp.  I preheat my oven to 200 degrees and stick the cookie sheet of coffee soaked leaves in for about 30 minutes.  This is where the leaves take on that almost-realistic curled, crispy texture and antique tea-stained look!
I love them paired with beautiful dried roses! Now, I bet you're thinking to yourself, "didn't she say these leaves were scented?"  Well, yeah...they smell like an old musty pot of coffee!  But that's not the scent I was hoping for.  When all was said and done, I lightly spritzed my leaves with a wonderful caramel praline scented room spray, then let them air dry a bit more.  A word to the wise...do not spray the leaves before putting them into the oven unless you want the smell to be so strong in your house that your eyes water and your lungs close up!  Yes, I am speaking from experience.  I was concerned about the spray being flammable but didn't see where it said it was on the bottle, so I went ahead and spritzed the leaves prior to drying in the oven.  Not such a great idea!  I don't recommend it!

These pretty paper leaves would be lovely strung together to make a garland, added to a Fall wreath, or simply scattered around to add a special touch to a table scape.  Get creative and have fun!
Don't you just love these big old glass salt and pepper shakers with their rusty tops?  I snatched them right up at a recent yard sale, took them home, cleaned them up (just a bit) and filled them with my dried Eden and Bonica roses.  They were added to my shop display this week along with many other special treasures.  I quickly set out a few items for a photo before I loaded them into my truck.  I wish I could get good pics of my actual shop display to share with you but the lighting just isn't ideal.
Thank you for your sweet visit today!  I hope you're enjoying these last couple "official" days of the summer season and looking forward to a cozy Fall!  I know I am!  I will actually be flying to salt Lake City for a few days to visit a very dear friend and her family this weekend!  I can't remember the last time I flew anywhere...pre-kiddos, I guess!  Besides some good, quality girl time, I am looking forward to the opportunity to sit on a plane and catch up on some of my favorite magazines!  There seems to be so little time for browsing through magazines these days!  I might pack the new Pottery Barn catalog that came in the mail today too!  Inspiration galore!  Happy days to you, my friends!

Best Wishes and Blessings,
Amanda
 sharing with these fun parties:
White Wednesday at Faded Charm
Wow us Wednesday at Savvy Southern Style
Open House Party at No Minimalist Here
Craft Link Party at Polly Want a Crafter?

Thursday, September 15, 2011

Wedding Cake Dining Room Ceiling

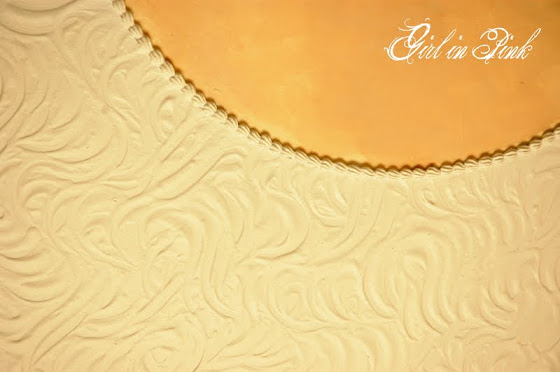
When our home was built 10 years ago (we are the second owners) a former cake decorator was hired to apply a design on the dining room ceiling.  He basically filled his pastry bags with plaster and created a design just as he would on a wedding cake!  Why am I sharing this with you now?  Well, last week when our adjoining living room space was featured on Common Ground's "Design Challenge," a suggestion prompted me to write this post. 
I really loved Debra's idea to swap our living room and dining area.  She was so right about it solving most of my issues with the space.  I loved the idea of a larger dining room, too!  Of course I hadn't shared the dining room ceiling in any prior posts and it wasn't visible in the photos I'd sent her. 
Even after I stood and stared at the ceiling and considered the challenge of moving the chandelier and sconces, I wanted to try the room switcheroo.  I discussed the idea with my mom later that day.  She is my go-to girlfriend when it comes to big decisions such as this!  She assured me that although the idea made sense from a spacial standpoint, Debra would probably agree that the wedding cake ceiling reads "dining room."
It was a really wonderful thought, Debra!  I just thought I'd show you why I've decided to keep the dining room where it is for now.  Of course Debra gave me a lot of other fabulous ideas to ponder, as did many of you!  Right away I started moving furniture around, taking into consideration all of the advice to create a "grouping" in front of the fireplace.  Already I have an arrangement that I really love, and I even edited out a little end table based on some of the feedback I received.  I now know that I need to invest in drapery panels and an area rug and I have some clear thoughts on slipcover colors as well!  It will be a one step at a time makeover but I am truly inspired and excited to have a vision now!  Special thanks to all of you who took the time to comment and share your wonderful ideas!  I promise to give lots of updates as I fulfill my dream of transforming my "Creative Escape."  Coming soon:  photos of the new furniture placement!

It's beginning to feel like Fall around here and it's putting me in a "crafty" mood!  I've been working on some things this week that I will look forward to sharing with you soon!  Also, I hit the road with a couple of girlfriends last weekend and shopped the Coburg Antique Fair for the first time!  We filled my SUV to the brim with goodies and I can't wait to share them with you!

Much more to come!  Thank you for your sweet visit!
Have a lovely weekend!
Best Wishes and Blessings,
Amanda


I will be sharing with these fun parties:
Vintage Inspiration Friday at Common Ground
Show and Tell Friday at My Romantic Home

Tuesday, September 6, 2011

Today is THE Day!!!

Debra over at Common Ground is featuring my living room TODAY for her Design Challenge Segment!  I have had a love/hate relationship with our formal living room for several years now.  I love the possibilities but not so much the current state.  I sent Debra several photos and a dissertation of my hopes and dreams for this room.  She is putting it all out there today for her readers to leave their thoughts, suggestions and ideas on how I can transform my living room into the room I've been dreaming about!  I can't wait to read what everyone has to say!  I hope you'll pop on over to Common Ground and share your thoughts too!  Just click on the lovely button below... and please spread the word!!!

A special thanks to Debra for choosing my room to feature today, and for the great design advice she has already shared!  I can't believe how absolutely generous Debra is being with her time and energy in helping fellow bloggers like me get new ideas for their challenging spaces.  Bless you, Debra!

Best Wishes and Blessings,
Amanda