Showing posts with label crafting. Show all posts

Tuesday, May 22, 2018

A Collage From the Heart


I spent an evening last weekend putting together a little project that's been on my mind and my heart for several months now. This beautiful antique oval frame came complete with the original convex glass but no portrait or painting inside. It was a garage sale bargain at $10. I rarely find these frames with the curved glass intact and always thought how fun it would be to create a dimensional collage to display inside.

I had so much fun putting this together and it's a sentimental piece for sure. The boy in the photo is my grandpa and the skeleton keys are a part of his extensive collection which I inherited when he passed away. I featured them in a blog post 6 years ago here. Although I have enjoyed the keys in various vignettes around our house over the years, I am so happy to have my favorites displayed with grandpa's photo.

Being a bit of a ham, he would have gotten such a kick out this little project of mine.


Currently the collage is hanging in my studio.  The small cabinet is another recent addition and although it probably won't stay here, I am liking this little vignette, until something else comes along.  Of course I love the cabinet's style and the wood is actually quite beautiful, so I probably won't paint it but...it's a humidor!  The inside is actually lined in marble.  It's a sturdy piece and incredibly heavy, but it has a few condition issues that I haven't figured out how to fix quite yet.  So, I'll just enjoy it for a while longer!

Thank you for your sweet visit!

Best Wishes and Blessings,
Amanda

Thursday, January 23, 2014

Inspired to Create...a Girly Little Vignette!

 
As I waited in line to pay for my treasures at a recent estate sale, I looked over the items in my basket and suddenly had a very distinctive vision!  Vintage dresses for real babies and doll babies alike, a felt hat, tiny shoes, a curved handled baby spoon and a collection of old photos inspired a couple of small makeover projects and then ultimately this very girly little vignette for my booth space at Camas Antiques.  Often times when I go shopping for treasures, I don't have any idea of what I am looking for or what I might find.  I love it when I come home with a collection of things that ignite a flame within my creative soul and inspire me into action!
 
 
A rather simple but sturdy small chest of drawers had a romantic makeover with a couple of coats of Chalk Paint® Decorative Paint by Annie Sloan.  I started with a custom mix of Antoinette and Old White for a soft, pretty pink.  I added the scalloped design in Old White and a simple hand painted flower chain in the custom pink along the edges to give it the look of eyelet lace.

 
Vintage photos add such charm to a vignette.  A photo of a cheerful little girl is attached to a bare lampshade, layered with a tiny vintage slip dress alongside a skirt, shoes and pearls.

 
This gorgeous handmade baby doll dress was badly stained when I brought it home from the estate sale.  After an overnight soak in Oxy Clean, it is bright and beautiful again!
 
 
A dark, cast-off lamp base was full of potential but in need of a face-lift.  I brushed on two coats of Old White and followed up with a wash in French Linen.  After a coat of Clear Wax and the addition of a shabby floral shade, it has a soft, pretty new look! 
 
 
I quickly chose these older hardback books primarily based on each one's cover and it's subtle hue.  Once home with them, I flipped through the pages and was pleasantly surprised by the intriguing content as well!  Books are such treasures!

 
Old photographs are fun to use in vintage inspired crafts or when creating vignettes.  I pick them up whenever I find ones that speak to me.  When I was little I bought old photos at antique stores and then went home to write fictional stories about the people in them!  I have scanned my most recent photo finds to share here and invite you to print them for use in your projects, or to inspire you to write stories or create vignettes!  Enjoy!


Creative inspiration for me comes in many forms and from many different avenues.  It can't be forced and it's a shame to waste it!  So, get out there and be inspired, and when the spark ignites...create!
 
Thank you so much for your sweet visit today!  I can't tell you how much I enjoy hearing from you!  Your kind words encourage and inspire me further!    You are a blessing and a treasure!  Have a fabulous week!
 
Best Wishes and Blessings,
Amanda


Sharing with...
Home Sweet Home at The Charm of Home
Feathered Nest Friday at French Country Home
Show and Tell Friday at My Romantic Home
Furniture Feature Friday at Miss Mustard Seed
 Furniture & Paint Party at Start at Home
Treasure Hunt Thursday at From My Front Porch To Yours
What's it Wednesday at Elephants and Ivy
Vintage Inspiration Friday at Common Ground 
Tweak it Tuesday at Cozy Little House
 Wow us Wednesday at Savvy Southern Style
 

Tuesday, May 8, 2012

How to Transfer Quotes onto Fabric Quickly and Easily!


I can't tell you how many people have asked me how I wrote the quotes on the painter's canvas drop cloth for the Jane Austen inspired window display.  I am afraid you won't be quite so impressed when you hear just how easy it is to do!  For me, the most difficult part was figuring the logistics of getting what I wanted, the size I needed, printed onto paper.  I am not a computer whiz.  I hope I can explain this clearly for you!

The font I used for my Jane Austen quotes was a free download from www.dafont.com.  I was so excited to find this font, based on Jane Austen's own handwriting!  I just love it!  There are so many fabulous fonts on this site.  A friend of mine who is a graphics designer turned me onto it and I have to admit that I have spent a little too much time perusing all of the great options.  Downloading fonts from this site to your computer can be a little tricky, unless you're technologically minded (not me!)  Look around the site though and you will find detailed instructions for your specific computer.  Of course you can also just use a font that you already have!


The program I used to type up my quotes is "Paint."  I think everyone has this program on their computer.  It seems to come standard, at least with PCs.  So, I typed up my Jane Austen quote, just the way I wanted it, in her hand written script in the "Paint" program.  I will describe the next few steps the way they looked with the version of "Paint" that I have.  If you have a different version, it may look a little different but I think you should still be able to find the right tabs to make it work.

1.  Click on the far left drop-down box (mine doesn't have a title, just an image that looks like a page of paper with lines on it).
2.  Go down to "Print" and move your mouse over to the right where another menu pops up with the options:  print, page setup, and print preview.  Choose "Page Setup."
3.  Select "Fit to" and enter the number of pages you want your quote to print on.  For example 3 and 2 will print your quote onto 6 pages.  You may have to play with this a bit before you get it just how you want it.
4.  After you select "okay," the window will go away.  You will then go back up to that drop down menu and select "print."  Make sure you print "all pages."  Keep in mind that some of your pages will probably be blank.  When you lay out your quote, you will see why!

I'd like to mention here that I once read about a website that does all of this work for you for free (if I understood it correctly).  I cannot seem to remember what the site was called or figure out where to find it, but if you know and would be kind enough to share it with me, I will post it here!


Once I had my quote printed the way I wanted, I had to cut some of the margins with my paper cutter in order line up the words just right.  I taped the pages together and then taped the whole quote up onto my giant light box (a.k.a. sliding glass door!) 


Next, I taped the drop cloth directly over top of the quote using masking tape.  It really helps to have an extra set of hands here if you're doing a larger transfer, and unless you have a huge picture window, you may have to do one half at a time, which is tricky.  I recommend keeping your quotes small enough to fit in your window, as I did in the photo above.  This will make your life much easier!  Now, as long as there is sufficient light shining through your window (this doesn't work in the evening or on a really dark, cloudy day...trust me, I tried!) you should be able to see the script through your drop cloth really well.  I used a black permanent marker to copy the quote and wrote it right there on my window.  I tested a few times to make sure the marker wasn't going to bleed through onto the glass, and it didn't.  I recommend you test it out as well with the fabric you're using.  I know you don't want permanent marker on your windows!  If you're nervous about it, or are using a lighter weight fabric, you can trace the words in pencil, take your fabric down and then go over it with your permanent marker on another surface (one that you don't mind marking up or that is lined with something to stop the bleed through).


There you have it!  I really enjoyed writing out these quotes and have some other fun ideas for using my big sliding glass door light box!  I hope you'll give it a try!  I'd love to see what you do with this project idea!  The possibilities are endless!


 Thank you for your sweet visit today!  I hope you are having a fabulous week!

Best Wishes and Blessings,
Amanda


Sharing this post with these fun link parties:
White Wednesday at Faded Charm
Wow us Wednesdays at Savvy Southern Style
Open House Party at No Minimalist Here
Vintage Inspiration Friday at Common Ground
Home Sweet Home at The Charm of Home
Inspiration Friday at The Pickett Fence
Feathered Nest Friday at French Country Home
Show and Tell Friday at My Romantic Home
Fridays Unfolded at Stuff and Nonsense

Monday, May 7, 2012

Au Revoir to My Pretty Table and Chairs


The table and chair set that I painted for the Jane Austen Inspired Window has sold and will be leaving the store tomorrow.  I am so happy that they are going on to a new home where they will be loved but sometimes it's just so hard to say goodbye!


As you can see, I was really having fun with this set in our living room.  If I could have only justified having a third dining set in our house, right next to the dining room...  Hmm...it seems a little excessive.  But it really came in handy when I hosted a ladies' game night last month.  Unfortunately that only happens once a year.  So, this pretty little set is moving right along to her new home!


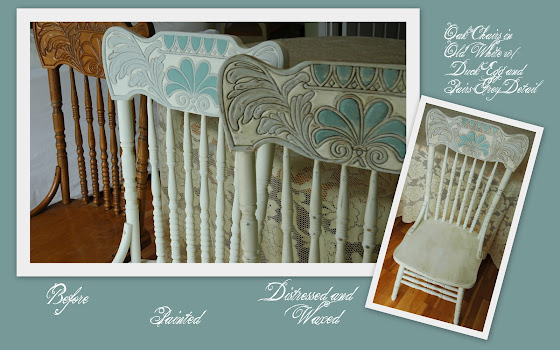
Here is a look at the progression of the chairs' transformation.  As always, I love how a little distressing and dark wax can add so much character to a chalk painted piece, especially one with lots of fun detail!


The colors I used here are Annie Sloan's Old White, Paris Grey and Duck Egg Blue. 


I thoroughly enjoyed painting the detail work on the chair backs.  It was all of those spindles that were so time consuming and monotonous.  This was one of those times when I wished I'd had a sprayer and a place to spray my furniture....just for all of those gazillion little spindles!


You can read more about the table sold with the set of chairs by following the link here.


Here is one more look at the dining set in it's home in the window.  Tomorrow, the scene will be a bit different.  I wish I had another beautiful painted set to put in it's place, but I am just not quite that prolific with my painting.  What I do have is a lovely old round, wood gate leg table.  I think it will work.  I hope to have a couple more pieces completed and worked into the display before the Mother's Day sidewalk sale on Saturday!  It will be a fun event, with coffee and cookies served and a free gift to the first 50 customers!  If you're in the area, please stop by! 
You are sure to find the perfect Mother's Day gift!

Thank you for your sweet visit!  I hope you are having a lovely day!

Best Wishes and Blessings,
Amanda


Sharing this post with these fun link parties:

White Wednesday at Faded Charm
Wow us Wednesdays at Savvy Southern Style
Open House Party at No Minimalist Here
Creative Things Thursday at The Vintage Farmhouse
Home Sweet Home at The Charm of Home
Vintage Inspiration Friday at Common Ground
Feathered Nest Friday at French Country Home
Show and Tell Friday at My Romantic Home
Furniture Feature Friday with Miss Mustard Seed
Friday Feature Party at Redoux Interiors

Thursday, March 29, 2012

French Inspired Art with Old World Appeal


Please join me at Pink Postcard today where I am guest-posting about a fun little project I recently completed!

Have a wonderful weekend, friends!
I will be back next week with another ASCP furniture makeover!

Best Wishes and Blessings,
Amanda

Tuesday, December 13, 2011

Beautiful Baby's Breath

I spotted bundles of lovely baby's breath at the grocery store last weekend.  They were quite inexpensive and there was something magical and Christmas-like about them, so I treated myself.  I am enjoying the little bundles in my old chippy white pottery pieces.  Amongst the white village, I think they look like bushy little snow covered trees!
I recently came across a couple of beautiful photos on Pinterest of baby's breath being used in creative and unexpected ways.  I love these hanging poms...
This wreath is simple yet so elegant and whimsical...

Baby's breath is so often used as filler in flower arrangements, but it makes such a lovely statement on it's own, and not just for weddings!  I think it's going to be my new favorite Christmastime flower!  You may even see it in my Christmas tree next year!

Thank you for your sweet visit!  I hope your week is off to a great start!
Best Wishes and Blessings,
Amanda

Join me at these fun blog parties!
White Wednesday at Faded Charm
Wow us Wednesdays at Savvy Southern Style
Primp Your Stuff Wednesday at Primp
Share the Love Wednesday at Very Merry Vintage Style
What's It Wednesday at Ivy and Elephants
Sew Crafty Tuesday at Ruby Jean

Friday, December 2, 2011

Dreaming of a Pink Christmas "Basket"

This week I put together a fun gift basket with a pink theme (of course!) for a silent auction to benefit our local school district.  I never pass up an opportunity to make something girly and pink!
The "basket" is a vintage doll cradle I recently painted.  Inside is one of my "I'm dreaming of a pink Christmas" signs, a vintage pink ruffled child's apron, a cute little wooden doll chair, a handmade pink flower hair clip, a couple of "dress-up" necklaces and an assortment of new and old pink ball ornaments.
I hope these sweet treasures make some good money for our school district and bring a smile to some special little girl's face this Christmas!

Thank you for your kind visit!  If you love pink, join me at How Sweet the Sound for Pink Saturday! 

Best Wishes and Blessings,
Amanda

Thursday, December 1, 2011

Skating at the Central Park

A couple of weeks ago I absolutely fell in love with this vintage print at the Salvation Army.  "Skating at the Central Park" by Winslow Homer.  It was a bit more than I would usually pay for something to resell...not much of a profit to be made, but I decided to splurge and bring something home for myself this time!  Turns out this print is not hard to find...if you love it like I do, you can pick one up off of Ebay for a modest price.  I did some tweaking in regards to the frame and mat to better suit my decor.  Here's what it looked like when I first brought it home...
Painting the frame cream was a given, but I had to think a bit about what to do with that bright green mat.  I eventually decided to tear pieces of sheet music and carefully adhere them to the original mat with a glue stick.  This was easy and so much more cost efficient than buying a new mat...which I would have surely have had to have custom cut. 
The overall size of the framed print didn't end up being large enough to hang above our living room mantle where I had originally pictured it, but I managed to find a good spot for it where it is being enjoyed and admired!
I just love the colors in this print, and the beautiful dresses and hats on the ladies.  This scene really reminds me of Little Women...now, I'm in the mood to watch the movie!  I wonder if it will be streaming on Netflix this season? 
I've loved every version I've seen.  Which is your favorite?
Of course no one has played Jo quite like Katherine Hepburn!  She was one of a kind!
I am such a fan of Elizabeth Taylor, that I couldn't not mention the 1949 version as well!  So many great old Christmas movies!  I look forward to re-watching them every year at this time, as I wrap gifts and work on Christmas crafts!

Thank you, dear friends for stopping by!  I am so very excited about the Christmas Blogger Block Party next week!  I will be sharing our Christmas decor (it's almost complete!) as well as some other festive things I've been working on!  I can't wait to see what everyone else has been busy doing to get into the Christmas spirit!

Best Wishes and Blessings,
Amanda


You'll find me partying with these sweet gals!

Debra - Vintage Inspiration Friday at Common Ground
Cindy - Show and Tell Friday at My Romantic Home
Sherry - Home Sweet Home at The Charm of Home
Courtney - Feathered Nest Friday at French Country Cottage
Honey - Potpourri Party at 2805
                                 Vanessa and Heather - Inspiration Friday At the Pickett Fence