Wednesday, November 6, 2013

Cinderella Cabinet Makeover


If an unattractive piece of furniture can be made lovely with Chalk Paint® Decorative Paint by Annie Sloan, an already lovely piece can be made the belle of the ball!  This hutch started out looking pretty darn good, but I knew it had the potential to be something extraordinary.  It reminds me a bit of Cinderella.  She was a cute girl.  She just needed her fairy god mother to step in, wave her wand around and turn her into princess potential!


Sometimes I wish a wave of the wand was all it took to work this kind of magic!  I love china cabinets and hutches but they can be tedious to paint.  I tend to get a little impatient!  Still, I won't argue that the end result isn't well worth the time and effort put into it!

 
For the body of the cabinet, I mixed up 3 parts Pure White to 1 part French Linen...probably not what you were expecting!  I love how versatile Chalk Paint® is.  One of these days I will post on how many different looks you can achieve with just two paint colors...it's amazing, truly! 


The accents received two coats of Old White.  After a fair amount of distressing, I applied a coat of clear wax and a very minimal amount of dark wax, focusing on the detailed areas.

 
 Deciding which parts to accentuate in Old White was a little tricky at first, especially since the hutch was split into two pieces and I was working on them one at a time.  I had to refer to my "before" photo several times to map out my game plan.
 
 
When it comes to painting details, I have all the patience in the world!  It's painting and waxing the interior of a cabinet that wears on me.  This is partly why I often line interiors with book pages or sheet music (I get lazy...please don't hold it against me).  I am always tempted to leave the inside of a cupboard "as is."  But I don't, because I can't tell you how many times I have watched customers at the store walk up to a piece of furniture, open a cupboard or drawer and look inside.  Do you do that?  I do, without even thinking about what I am doing!  I'm not sure what I expect to find, but if the exterior is painted and the interior is still wood...it sometimes feels like it's a bit unfinished, don't you think? 
 
 
I just love these tulle poms that I see all over Pinterest.  I decided to make some in ivory for my Christmas display, with the idea of them hanging like snowflakes.  I suppose they look more like snowballs, but still I am loving the look of them hanging from the bare tree branch.  It creates just the whimsical, snowy winter scene I had imagined!  I may be working these into our Christmas décor at home as well!
 
 
As I finish up a few more projects for the Holiday Open House, I will be posting preview photos on Facebook, so please be sure to join me there!
 
Thank you so much for your sweet visit today!
 
Best Wishes and Blessings,
Amanda
 
 
Sharing with...
Home Sweet Home at The Charm of Home
Feathered Nest Friday at French Country Home
Show and Tell Friday at My Romantic Home
Furniture Feature Friday at Miss Mustard Seed
 Furniture & Paint Party at Start at Home
Treasure Hunt Thursday at From My Front Porch To Yours
What's it Wednesday at Elephants and Ivy
Vintage Inspiration Friday at Common Ground 
Tweak it Tuesday at Cozy Little House
 Wow us Wednesday at Savvy Southern Style


Wednesday, October 30, 2013

Use Your Printer to Create Oversized Art


A lovely image from Pinterest inspired me to make an attempt at a piece of art to fill an extra large frame in our dining room.  I pinned this photo to my "Fun and Funky Diplay Ideas" board a year ago and keep going back to study it.  What I have created doesn't really compare to this amazing wall, but this is the image that originally caught my eye and got the wheels turning in my head! 

 These appear to be sketches on old papers and fragments of antique documents.  I am no sketch artist.  I think my 5 year old's drawing skills are better than my own!  So, I have come up with a method for using images from the Graphics Fairy  printed on book pages and sheet music to create an oversized piece of artwork that I wanted to share with you here. 


My attempt is feeble...and I know I can do better.  I have plans to use this idea to create more pieces in the future.  My mind is racing with the possibilities.  I bet yours will be too by the end of this post!

The bird images from the Graphics fairy were printed on the sheet music and stuck inside of my big white frame about a month ago.  I used this very method that I am going to explain here.  I have been staring at those birds for a month now, thinking I needed to add something else...like a tree.  So, as I put together a tree on book pages today, I photographed the process and thought I would write up a tutorial.
 
 
I use the program called "Paint" to enlarge my image.  I believe this program comes with most PCs.  I used this same process for printing the quotes that I transferred onto fabric here.
 
After I had written that post, a couple of my readers shared websites with me that also allow you to enlarge images.  I have not used any of these websites, but thought I would list them here in case you don't have Paint on your computer.
 

In the upper left corner of your "Paint" window is a "Paste" button.  When you click on this button a drop box should appear with the words "Paste From."  When you click there, a window will open displaying your computer files.  I had previously saved the tree image to my desktop, so it was easy to find.  When I double clicked on it, it came up in my Paint window.  Another feature about the Paint program that I like is that it allows you to erase parts of an image that you don't wish to print.  This was actually a picture of 3 trees.  I simply erased the two that I didn't want.
 
 
Once I had my tree looking just right, I went to "print" and then "page setup."  In the page setup window, you can change the orientation of your pages and "Fit to" the number of pages wide by tall you want your overall image to be.  You can see that I made mine 4 pages wide by 6 pages tall.  Before I put my paper into my printer, I numbered each page in the upper right hand corner to reference (1-24) (you'll see why later).
 
 
As you can see, There are not 24 pages here.  I chose the ones I wanted to use and put the others aside.  This is my template.  Now I know which of these pages are going to be printed on and which will be blank.
 
 
 I then went to work with my glue stick, adhering book pages over the printed images, paying careful attention to those page numbers and the way the image printed.  I put my page numbers in the upper right hand corner of the pages, just as I set them in the printer, but the images came out of the printer the opposite way, so I glued my book pages upside down.  Does that make sense?  I think that different printers print different ways, so pay attention to these details if you want to save yourself some headache and extra work. 
 
My printer prints on book pages and sheet music just fine.  It's not a fancy or expensive printer, so I run all kinds of things through it that I probably wouldn't if I was really concerned about it.  You know your printer and what it can handle...please don't break your printer and come back to blame me.  I always make sure my book page edges are glued down well to printer paper and that there is no excess glue or sticky spots that might gum up my printer.
 
 
Once I had all of my pages back in order by page number, and facing the right direction, I loaded them into the printer and hit the "print" button for the second time.
 
As you can see, I had some margins and white areas to trim off.
 
 
 That's where my paper cutter came in handy!
 
 
From there, it was a matter of piecing together the puzzle.  I could have left it at that, glued down the pages onto a large board and filled in the voided areas with more book pages, but I had my sheet music bird art that I wanted to add this to, so I took my scissors and cut around the tree a little more before gluing it down with a glue stick.
 
 
When creating a piece to go inside of a frame, like this one, I just use the piece of cardboard that came inside the frame to glue my pages to. 
 
 
This is an older photo of my shop display, but I wanted to show how I basically used this same method to create my "Girl in Pink" signage on the back wall of my booth.  Instead of sheet music or book pages though, I used plain old printer paper that I had "aged" with coffee.  You can read more about my paper aging method here
 
 
I created a smaller version using these same methods and techniques to fit inside of this frame for a couple of flea markets I participated in last summer. 
 
I hope these instructions were easy to follow!  I really think that once you try it for yourself, you'll see how simple it is and how completely endless the possibilities are!
 
Let your imagination run wild!  Be creative and have fun!
 
Thanks so much for your sweet visit today!
Best Wishes and Blessings,
Amanda


Sharing With:
 
Tweak it Tuesday at Cozy Little House
Inspire Me Tuesday at A Stroll Through Life
Home Sweet Home at The Charm of Home
Feathered Nest Friday at French Country Home
Show and Tell Friday at My Romantic Home
Treasure Hunt Thursday at From My Front Porch To Yours
What's it Wednesday at Elephants and Ivy
Wow Us Wednesday at Savvy Southern Style
Vintage Inspiration Friday at Common Ground
 

Thursday, October 24, 2013

Feathers, Boots and Chalk Paint®

 
Hi there!  Thanks so much for stopping by!  It's been a good day!  The sun is shining and I have neglected all of my household chores and duties to play with paint and feed my creative soul!  Tomorrow will be my catch up day...oh boy do I have some catching up to do!
 
Oh, but don't worry...I didn't neglect the children!  They spent the day with grandma! 
Thank God for grandmas!  Yay!
 
 
I picked up this little chest of drawers from a neighbor's garage sale last month.  He told me that it was his as a little boy and that his parents gave it to him unfinished.  It was his first furniture staining project.  I asked if he would mind me painting it...he said no.  I am sure he was just happy to have it out of his garage.  Still, I felt a little guilty painting over his handiwork.
 
 
These lovely feathers are the work of Martha Stewart Silkscreens available at Michaels Craft stores.  If you're unsure about silkscreens...they work similar to a stencil.  I had not had experience with them before this project.  The instructions talk about using a trowel or sponge, but I went ahead and used a paint brush, just as I would with a stencil.  It really worked beautifully!  The nightstand was painted in a 50/50 mix of French Linen and Old White Chalk Paint® Decorative Paint by Annie Sloan.  The feathers were painted in Old White. 
 
 
The pulls were in my stash of vintage hardware.  I tried painting some newer pulls but just didn't care for the look.  These large, ornate gold pulls really add to the funkiness of all the feathers and carry through the old world look I was going for.
 

 I have been dying to paint a pair of boots with Chalk Paint® for months now!  Finding a pair for a good price in my size wasn't easy.  Whenever I was out and about at the thrifts and antique stores, I was keeping an eye out for the boots!  Do you know where I found them?  They were in a friend of mine's space at Camas Antiques a few weeks ago!  Just my size and only $10!  Thanks, Michelle!
 
 
I had the hardest time deciding what colors to paint these boots!  I would love to have some cowgirl boots in Duck Egg or Aubusson Blue...next time!  I finally decided I had to start with pink!  So, these are my French Linen/Antoinette boots with stitched details in Old White. 
 
 
The boot bling is a versatile piece of jewelry by Mialisia that can be worn as a necklace, belt, bracelet or as a great way to dress up your boots!  I have a friend that is selling this jewelry, so I have invested in a few pieces and am really having fun with them!  If you're interested, you can check out Jana's Facebook page here.
 
 
This fun little chest of drawers is headed to the shop and the boots are going on my feet!  I'll try to post a photo of them on me sometime soon and I will let you know how they hold up after I've worn them a few times!  I have a lot of faith in the durability of Annie Sloan's waxes, so my guess is that my new pink boots will wear beautifully!
 
Enjoy the rest of your week!  Get out there and feed your creative soul!
 
Best Wishes and Blessings,
Amanda


Sharing with...
Home Sweet Home at The Charm of Home
Feathered Nest Friday at French Country Home
Show and Tell Friday at My Romantic Home
Furniture Feature Friday at Miss Mustard Seed
 Furniture & Paint Party at Start at Home
Treasure Hunt Thursday at From My Front Porch To Yours
What's it Wednesday at Elephants and Ivy
Anything Blue or Pink Friday at The Dedicated House
Vintage Inspiration Friday at Common Ground
 

Monday, October 21, 2013

Weekend Treasure Hunt

 
Happy Monday!  I hope you had a lovely weekend.  Ours was busy, as usual but I managed to run in and out of one small estate sale down the road from us before my little guy's soccer game.  Although I didn't come away with a large haul of goods or even any furniture, what I did find I think is pretty special.  I enjoyed cleaning up my finds and arranging them for a few photos to share today!
 
 
The woman who had passed away was an incredible seamstress who also did beautiful needlework and crochet.  This unfinished needlepoint canvas kept catching my eye.  At the time I couldn't think of why I would buy it, but it was so lovely that I knew it just had to come home with me.
 
 
Of course once I got home, it hit me!  What a perfect display for a few pair of vintage earrings or a brooch or two!  So, I removed the guide threads and did a quick white wash on the wooden frame.  Voila!  I am so happy to have salvaged a piece of this woman's handiwork that might have otherwise been tossed away because it was "unfinished."
 
 
I also came home with the most metal and glass flower frogs that I have ever found in one place!  There are so many different styles and sizes, leading me to believe that this woman was also a great floral designer!  This little brass frog with it's black metal base is my favorite.  It was probably designed to fit inside of a skinny bud vase.  I love these for displaying old photos and cards.  I plan to share more of them later.
 
 
At another sale earlier in the week I found a few interesting pieces of vintage jewelry.  As jewelry is not necessarily my area of expertise, I stick to a set price point and buy what catches my eye.  I thought this pin was quite unique.
 
 
I loved the patina on this little old box.  The woman I bought it from said she figured it to be at least 80 years old.  I imagine it probably sat on a fireplace mantle filled with matches, but I could be wrong.  What do you think?
 
 
That brings us to my biggest and maybe best find of the weekend.  The wonderful seamstress and needlepoint crafter, had at some point had a custom dress form created for herself.  
 
 
Clearly she made a lot of her own clothing.  Her home had one whole room filled with fabric, another with all kinds of thread and trims.  I feel so fortunate to have had the opportunity to buy her vintage dress form!  It is now available for sale in my shop space at Camas Antiques.  I just know it will soon be going home with someone who will treasure it as a piece of art in their home or studio space! 
  
 
Coincidentally (or maybe not), I recently rented Lifetime's movie on Coco Chanel from Amazon.  It was very well done and so inspiring!  I loved the imagery and am fascinated by the story of Gabrielle Chanel.  I get a lot of inspiration from costume dramas.  I think that is evident in my shop space display right now, with the vanity, dress form and antique sewing machine.  I ran in and out of the shop so quickly yesterday that I didn't get a photo of it all together.  I will do my best to get one soon and will most likely post on Facebook, so please be sure to join me there.
 
Thank you for your sweet visit today!
 
Have a wonderful week!
 
Best Wishes and Blessings,
Amanda
 
 
Sharing With:
 
Tweak it Tuesday at Cozy Little House
Inspire Me Tuesday at A Stroll Through Life
 

Thursday, October 17, 2013

Restyling and Repurposing Vintage Luggage

 
As you can see, I've been painting more pink this week!  While working on making over a few vintage suitcases and trunks, I ran into some issues that required creative thinking to resolve.  I also dreamed up some ideas on how to use these freshly made over pieces and thought I would share those with you here, along with some of the solutions I came up with for fixing the problems I ran into.
 
 
This trunk has been sitting in the garage awaiting a makeover for many months now!  See all of that tape residue in the before photo?  I tried some of the "goo" remover solutions but none of them seemed to do the trick.  I finally decided to try painting right over the top of it, thinking it would just add some texture, right?  Right, indeed!  Chalk Paint® Decorative Paint by Annie Sloan covered all of that right up and after a good waxing, it has a beautiful, durable new finish. Honestly I can only see signs of that tape residue in a couple of small places, and it really just adds to the patina! 
 
 
 When making over suitcases and trunks, I will often paint the hardware a contrasting color.  I loved the antique gold patina on the hardware of this trunk and therefore decided to leave it and let it be the focal point of the finished piece.  It was a little time consuming, but I just took a small paint brush and worked carefully around each piece.  I think the end result is well worth the extra effort!
 

I painted this piece in Antoinette accented in Old White followed be clear and dark wax.  It looks lovely with my other craft storage pieces in my studio and fits perfectly under my desk!  I am considering using it to house my printer and paper!  It will require a bit of retro-fitting and when I get around to it, I will share the results in another post!


This vintage suitcase had the most horrible odor.  Had I noticed the smell at the barn sale where I found it, it probably wouldn't have come home with me.  The interior looked really nice...no stains, rips or holes.  I had hoped to preserve it.  I read about all kinds of methods for getting rid of odors...coffee beans, dryer sheets, vinegar, Febreeze.  I tried them all...and gave them ample time to work!  All of those things help to mask an odor, but they don't actually remove it.  I finally decided that the fabric would have to be removed.  Do you know what I found under the suitcase lining?  MOLD!  Yuck!  So, keep that in mind if you have an old piece of luggage with a musky odor.  No amount of Febreeze is going to get rid of that!

I don't have a specific method for removing suitcase lining, just grab a hold of it and pull!  Once I had it all out of there, I cleaned it up the best I could and painted the interior with Kilz primer which is designed to block stains and odors.  I then left the suitcase open in the garage to dry for a couple of days and applied a second coat of Kilz.  I had to make sure that mold was gone for good!  Once the primer had completely dried, I decoupaged book pages to the suitcase interior.


Suitcases and trunks are great for all kinds of storage but I love the idea of using them to display a vignette as well!  This suitcase was perfect for this as it stays open nicely on it's own and even has a hook for holding hangers.


I picked up this amazing old Singer sewing machine while on a little road trip with my mom a couple of weeks ago.  It's in pretty rough shape but just look at those sweet birds!  I love it!

 
 The craftsmanship and detail put into these old machines just fascinates me. 

 
The freshly painted book page lined suitcase turned out to be the perfect host for a little sewing vignette.  I plan to take it to the shop this week along with some vintage sewing notions and linens.
 
 
The exterior of this case was also painted in Antoinette and I went a little crazy with a stencil in Old White.  After a coat of clear wax, I added a good amount of dark to give this piece that old, weathered and worn look.
 

 That's one boring old stinky suitcase restyled, repurposed and de-odorized!

 Don't overlook trunks and luggage at estate sales and thrift shops just because the exterior has ugly stickers or tape residue, or isn't a desirable color, or the interior lining is ripped stained or smelly!  These pieces are fantastic for storage and/or display.  With Chalk Paint®, and a little imagination these pieces can be beautiful and functional once again!
 
Thank you so much for your sweet visit today!  Enjoy the rest of your week!  
Get out there and create something lovely!
 
Best Wishes and Blessings,
Amanda


Sharing with...
Home Sweet Home at The Charm of Home
Feathered Nest Friday at French Country Home
Show and Tell Friday at My Romantic Home
Furniture Feature Friday at Miss Mustard Seed
 Furniture & Paint Party at Start at Home
Treasure Hunt Thursday at From My Front Porch To Yours
What's it Wednesday at Elephants and Ivy
Make it Pretty Monday at The Dedicated House

Thursday, October 10, 2013

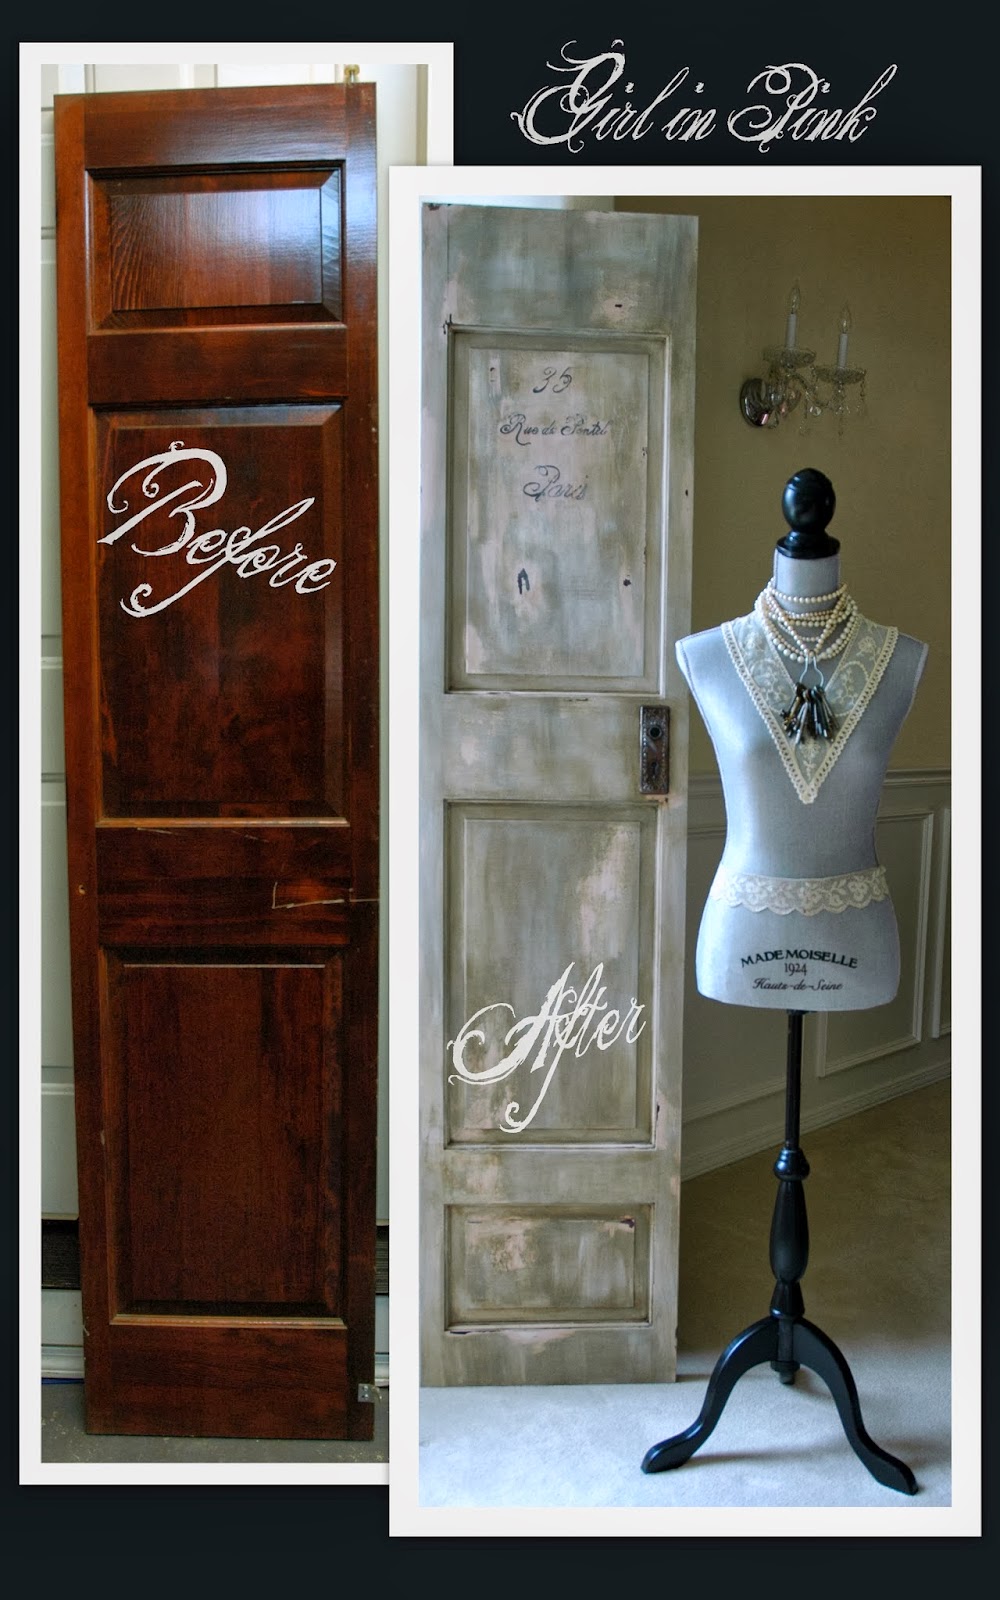
Door Decor...Creating Patina Where There Was None

 
Hello!  I am excited to show you what I've been working on this week!  It seems like it takes me forever to finish a project these days.  I really haven't had any extended periods of time to work on anything...so, it's just a little here and a little there, in between fixing meals, doing laundry and running kiddos around.  It sure feels good to have something completed and ready to share today!

 
I have had the idea for this weathered looking pink and grey door flitting about in my head for literally months now! 
 
 
Last winter I painted this pink door for the shop.  I purchased a few of the skinny doors, once bi-folding, removed from a home where some remodeling was being done.  If I had more storage space, I would have bought all of them (there were at least 30 for sale!)  Boy, sometimes I wish I wasn't so practical!  Doors are such fun to paint and these are a really nice size to use as a decorative, architectural element for any room.
 
 
As with any piece that I set out to paint, creating patina where it may not have existed originally, it helps to first develop a story for it!
 
 
 I imagined an old building in Paris with many oddly shaped doors opening out onto an alley way.  Maybe they were offices and studios.  This one led to an aspiring fashion designer's tiny little studio.  She proudly painted the little door to her first studio pink and very carefully painted her address near the top;  35 Rue du Pontel, Paris.
 

  Years passed and the aspiring fashion designer became successful and moved on to a larger studio in a fancy modern building, leaving her little pink door behind.  A young photographer moved in and repainted the door a dark grey.  People and businesses came and went, and nearly one hundred years after the door received that first coat of pink paint, the building underwent reconstruction and the little door was removed.  It sat in a salvage yard, collecting dirt.  The pretty pink showed through in spots and even a bit of the original wood grain.  What stories this door might tell!  And now, retired from it's position as a useful door, it has graduated to a piece of art to grace the corner of a beautifully decorated room.
 
 
Making up the story about a piece is sometimes almost as much fun as painting it!  The true story of how the skinny pink and grey door with loads of patina and charm came to be is here...
 
1.  One coat of Antoinette, Chalk Paint® Decorative Paint by Annie Sloan
2.  Address painted on in Graphite, Chalk Paint®
3.  Artisan Enhancements Crackle Tex medium applied in spots to create texture where the second layer of paint would be pulled away to reveal the pink underneath.
4.  French Linen and Pure White Chalk Paint® painted on simultaneously, working in sections, pulling away while still wet with a paper napkin, sometimes wiping with a baby wipe.
5.  After allowing everything to dry completely, I used my wax brushes to apply Annie Sloan's clear and dark waxes.
6.  I added the cool door plate, found at an antique show.  Luckily I had 2 old rusty screws in the garage!  I painted where the knob would have gone and inside the key hole with Graphite, followed by dark wax.  I also added more dark wax around the door plate to make it look as though it had always been there. 
 
 
If you're thinking of adding patina to a door, check out some authentically old doors on my Pinterest board Incredible Doors, for inspiration!
 
 
Thank you so much for stopping by for a visit today!  I hope you are having a lovely week!
 
Best Wishes and Blessings Always,
Amanda


Sharing with...
Home Sweet Home at The Charm of Home
Feathered Nest Friday at French Country Home
Show and Tell Friday at My Romantic Home
Furniture Feature Friday at Miss Mustard Seed
 Furniture & Paint Party at Start at Home
Treasure Hunt Thursday at From My Front Porch To Yours