Friday, April 3, 2015

How to Create Beautiful Finishes on Flower Pots and Seal Them for Outdoor Use!


With the Spring season underway, it’s time to start thinking about adding color and beauty to
our outdoor living areas. Why not create some custom painted flower pots for your porch or
patio? Here’s a little inspiration to get you started and the lowdown on what products to use
to make sure that your paint finish holds up outdoors for months to come!


Terra cotta pots are great blank canvases for outdoor art. For this project, 3 various sized
pots were painted, one in Antoinette, one in Paris Grey and one in Duck Egg Blue.


Once the paint was completely dry, Fine Stone, an exterior grade plaster product with
aggregate texture from Artisan Enhancements was pushed through a small portion of their
large format Venetian Damask stencil.


Creating a raised stencil relief like this one on a curved surface can be a bit tricky. It helps to
tape the stencil down. Use a color shaper tool to smooth the Fine Stone across the stencil to
make the design go on evenly. As soon as you have covered the area of the stencil you want
to appear on your pot, lift the stencil straight up off of the surface. Your stencil will clean off
easily with water and a soft rag if you take care of it while the Fine Stone is still wet.


Drying time on the Fine Stone varies depending on how thickly you have applied it but it
should be completely dry within a few hours. To create an aged patina, apply a thick layer of
Artisan Enhancements Crackle Tex all over your pot and allow it to dry before proceeding.


Once the Crackle Tex has dried, a second paint color can be applied. Here, Old White was
brushed on thickly. When painting over Crackle Tex, it is important to not overwork
the surface as the crackle medium will start to activate quickly.


As soon as the cracks begin to appear, you can begin to remove areas of the top layer of
paint with a damp sea sponge. Distress as much or as little as you like until you are pleased
with the overall look.


As great as this finish looks at this stage, one more step will add additional depth to the
design.


Artisan Enhancements Scumble tinted with a French Linen/Old White mix was used to create
a glaze to further age and enhance the patina of the 3 flower pots. Five parts Scumble to one
part paint was the ratio used for this step. The glaze was brushed on and then wiped back
with a damp sea sponge.


After giving the Scumble glaze around 40 minutes to dry, you can proceed with sealing your
pots for outdoor use. Artisan Enhancements Clear Topcoat Sealer is an eco-friendly
exterior grade sealer. Use a quality brush such as Artisan Enhancement’s Topcoat brush to apply a
thin layer on both the exterior and interior of the flower pot. The pot’s interior should be
sealed to insure that once planted in, nothing from the soil will seep through the porous clay
pot and effect the paint finish.

Note the minimal amount of sealer on the brush in the photo above. A little goes a long
ways!


At least 2 thin coats of Clear Topcoat Sealer should be applied, giving the first coat ample
time to cure before applying the second. Twenty four hours is recommended.


Once your pots are painted, stenciled, crackled, glazed and sealed, the creativity doesn’t
have to end there! Consider stacking varying sized pots for a tiered display. Once these
three were filled with potting soil, a dowel was pushed down through the centers to hold them
in place.


The dowel was then trimmed down and a half flat of white Alyssum was planted in the top pot
and around the edges of the bottom two.


Though the flowers may wilt in the sun or die back come winter’s frost, with Artisan
Enhancements exterior grade Clear Topcoat Sealer, the new finish on these flower pots will
still be beautiful come time for next year’s plantings!


Thank you so much for your visit!

Best Wishes and Blessings,
Amanda


Disclosure: This is an Artisan Enhancements sponsored post, however the opinions and ideas expressed here are mine and I will only ever promote products that I enjoy using and feel may benefit my readers.


Sharing With:
Home Sweet Home at The Charm of Home
Feathered Nest Friday at French Country Home
Show and Tell Friday at My Romantic Home
Treasure Hunt Thursday at From My Front Porch To Yours
 Friday's Unfolded at Nancherrow
 Furniture Feature Friday at Miss Mustard Seed
What's it Wednesday at Ivy and Elephants

Thursday, April 2, 2015

Ready for Spring!

 
Happy Spring!  This is my absolute favorite time of year!  I thought I would just share some photos today of my booth all full and ready for the birthday sale last month at Camas Antiques.  I am so glad that I took photos when I did because most of what you see here is long gone.  The good news is that I have been busy painting up a storm and am going to have lots of makeover projects to share very soon, along with a couple of fun tutorials.  So...stay tuned!
 
 
Last month I did a little Easter crafting and made some pretty tags that I tied to colorful baskets.  A few are still available in my booth.
 
 
I had two of these lovely nightstands that I simply painted in Old White, lightly distressed and then sealed with clear wax.  They were sold the day after I delivered them to my booth!
 
 
Aren't these little vintage lawn dresses the cutest?  I discover them here and there, carefully soak them in a special linen wash, lay them out to dry and then iron each one.  It is quite a process, but I enjoy it and they look so sweet displayed on a pretty wall rack.  Most of the ones I took in for the sale have sold, but I just added a few more to my booth and hope to continue to find more to offer for sale.
 
 
I have also been adding more beautiful vintage slips and nightgowns to my pink wardrobe!
 
 
For anyone in my area interested in workshops, here is our schedule for April at Camas Antiques.  I would love to have you join me for one or both of these fun evenings this month!
 
Thank you so much for your sweet visit!
 
Best Wishes and Blessings,
Amanda


Sharing With:
Home Sweet Home at The Charm of Home
Feathered Nest Friday at French Country Home
Show and Tell Friday at My Romantic Home
Treasure Hunt Thursday at From My Front Porch To Yours
 Friday's Unfolded at Nancherrow
 Furniture Feature Friday at Miss Mustard Seed
What's it Wednesday at Ivy and Elephants 


Tuesday, March 10, 2015

How to Create a Watercolor-Like Finish!


Create a watercolor effect on furniture and accessories by layering pastel color tinted glazes
over your paint finish!


Start by painting your piece in a solid color. Antoinette was used here for one piece and Duck
Egg Blue for another. Once the paint has dried, you may choose to add a stenciled design.
 
 
Part of the Artisan Enhancements Chandelier stencil design was applied here in Old Ochre to
frame the metal hook that would later be added. When the stenciled design had dried, it was
sanded lightly with fine grit sandpaper for a more natural, muted look.
 
 
Artisan Enhancements Scumble can be tinted with paint to create a custom glaze color. Here
1 part Louis Blue to 5 parts Scumble was mixed for one glaze, and the same ratio Paloma to
Scumble for another.


The Scumble mixtures were applied one at a time with a brush, and then wiped back with a
damp sea sponge. The extended open time of the Scumble product allows you to wipe away
the glaze, add more and play with the finish until you are satisfied with the results.


 Here both Antoinette and Paloma were mixed with Scumble to create 2 separate glazes that
were applied overtop a board painted with Duck Egg Blue and stenciled in Old Ochre.
 
 
Once you have achieved a watercolor effect that you are happy with, you will want to protect it
with a durable sealer. The Scumble product leaves you with a flat, silky finish. To enhance the sheen, apply a thin coat of Clear Finish. Wait 23 hours and apply a second coat. For more of a matte finish, choose Artisan Enhancements Clear Topcoat Sealer.
 
 
With Artisan Enhancements Scumble, you can mix any number of custom tinted glazes and feel like a true artist as you layer them onto your paint finish! Consider creating a watercolor-like finish for your next furniture or home accessory makeover!

 
Disclosure: This is an Artisan Enhancements sponsored post, however the opinions and ideas expressed here are mine and I will only ever promote products that I enjoy using and feel may benefit my readers.


Thank you so much for your visit today!
 
Happy Creating!
 
Best Wishes and Blessings,
Amanda


Sharing With:
Home Sweet Home at The Charm of Home
Feathered Nest Friday at French Country Home
Show and Tell Friday at My Romantic Home
Treasure Hunt Thursday at From My Front Porch To Yours
 Friday's Unfolded at Nancherrow
 Furniture Feature Friday at Miss Mustard Seed
What's it Wednesday at Ivy and Elephants


Thursday, March 5, 2015

Fantasizing About a Pink Wardrobe...

 
For months now I have been fantasizing about a romantic pink wardrobe filled with lacey vintage slips and nightgowns.  Does that sound silly?  Why?  Don't you fantasize about furniture?  Surely something must have triggered the image in my mind...a dream or maybe one of the dozens of old glamorous Hollywood classic movies I have loved throughout the years.  Either way, I couldn't shake the vision.  I searched for the perfect wardrobe.  A few candidates popped up on Craigslist but they all slipped through my fingertips until I came across this one.  I was the first to call on the ad.  I felt like the winning contestant on a game show!
 
 
I knew immediately that a few beautiful appliques from The Purple Pear would add just the right amount of glamour and romance needed to start the transformation.  I first removed the wooden bar handle that was screwed onto the front of the door.  It wasn't bad, but it interfered with my vision.
 
 
The appliques were so easy to apply.  I steamed them for a few minutes by placing them on a cooling rack that rested on top of a pan of boiling water.  This made them pliable enough so that I could lay them flush against the face of the wardrobe.  I should mention that the wardrobe was laying on it's back while I was applying the appliques.  I added just a little bit of wood glue to the back of each applique before adhering them to the wardrobe.  I was able to curve the long floral piece along the top of the door just the way I wanted it by working with it while it was still pliable after steaming.
 
 
After giving the wood glue about 24 hours to fully bond the appliques to the wardrobe, I went to work painting the entire piece in Old White Chalk Paint®.  I then used Artisan Enhancement's Easy Crackle in several areas to add some extra patina.  Once the Easy Crackle had dried, I went back over the entire piece with a custom mix of 3 parts Old White to 1 part Antoinette.  Just as that top layer of paint started to dry, the cracks began to appear!  After some heavy distressing around the edges, I sealed the finish with Annie Sloan's clear and dark wax.  I just love how the dark wax looks in those cracks!  Patina perfection!
 
 
I finished the inside of the door just as I had the exterior, but the interior of the wardrobe ended up getting a quick wash of an Old Ochre/Old White mixture.
 
 
The appliques, much to pretty and special to leave as is were hand painted first in Old White, followed by clear and dark wax and lastly, heavily highlighted with King's Gold Gilding Wax from The Purple Pear.
 
 
The pretty pink wardrobe is now in my booth at Camas Antiques, filled with beautiful vintage slips and nightgowns.  At this time it is not for sale.  I've decided to enjoy my fantasy for a while...plus I have more pretty vintage frocks to add to the selection soon.
 
 
This basket of elegant treasures is just awaiting vintage laundry day...  Coming soon!
 
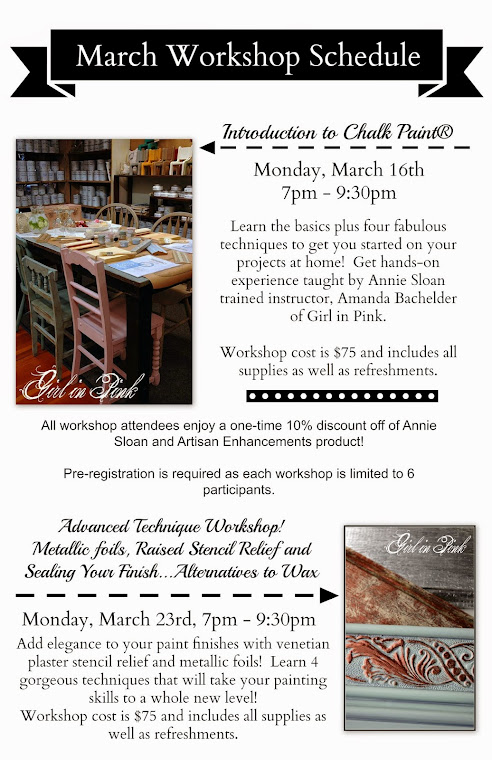
And for those of you who live in my area, here are some details about my upcoming workshops at Camas Antiques!  You can register in the store or by phone, 360-834-4062.
 
Please feel free to email me with any questions you may have:  onegirlinpink@gmail.com
 
 
Remember that amazing Downton Abbey inspired servant's bell board that Tommy made for my window display in January?  It was such a big hit that he decided to make another! 
He just listed it on Ebay!  What a fun addition this would be to the home of a die-hard fan!
 
 
Thank you so much for your sweet visit today!
 
Best Wishes and Blessings,
Amanda


Sharing With:
Home Sweet Home at The Charm of Home
Feathered Nest Friday at French Country Home
Show and Tell Friday at My Romantic Home
Treasure Hunt Thursday at From My Front Porch To Yours
 Friday's Unfolded at Nancherrow
 Furniture Feature Friday at Miss Mustard Seed
What's it Wednesday at Ivy and Elephants


Wednesday, February 25, 2015

All the Charm of an Antique Dresser, Minus the Spiderwebs!


Pictures can be deceiving.  The photo that drew me to this majestic dresser posted on Craigslist was somewhat dark and grainy.  After making a quick call to the seller, I was on my way to look at what I thought was an old oak dresser.  Yes, I should have asked more questions before I got too excited but was worried that taking the time to ask questions would give another buyer a chance to say, "sold!  I'll be there in 10 minutes!"  It happens, a lot!  Used furniture sales are very competitive these days!  

So, I was a little disappointed when I arrived to discover that the dresser I had driven across town to see was a reproduction.  However, the drawers were dove-tailed and the piece was solid and clean.  A pretty dresser with great bones and drawers that opened and closed without needing any TLC!  So what if it wasn't old, I decided it was a perfect candidate for paint.  What a treat to not have to do any repairs, vacuum away cobwebs or scrape finger nail polish out of drawers!  I just hauled this big heavy dresser home, did a quick wipe down and got to work!


The color is a custom mix of 1 part French Linen to 1 part Old White.


I painted out the wood carved accents in Old White.  After a coat of Clear Wax, I used Annie Sloan's Dark Wax to further age and bring out the details in the carvings.

I removed the hardware and painted it in the custom soft grey mix and then waxed it just as I had the entire piece.  I considered painting the hardware in Old White like the carvings but decided that it would be overkill.  Sometimes less is more, as they say.


I have a confession to make.  I absolutely despise waxing the insides of cupboards and drawers.  I am not a contortionist.  So, even when I've chosen to seal a piece of furniture with wax, I find Artisan Enhancements Clear Topcoat Sealer to be ideal for sealing any paint finish on the interior of the piece.  Just brush it on, let it dry for 24 hours and apply a second quick coat.  No more standing on my head to buff out wax on the top of a cupboard's interior!


I am really loving how this piece transformed.  It may not be antique but I think it now has just as much charm and character as any 100 year old piece pulled out of a decrepit farm house, minus the mold, mildew and spiderwebs!

Thank you for your sweet visit today!

Best Wishes and Blessings,
Amanda


Sharing With:
Home Sweet Home at The Charm of Home
Feathered Nest Friday at French Country Home
Show and Tell Friday at My Romantic Home
Treasure Hunt Thursday at From My Front Porch To Yours
 Friday's Unfolded at Nancherrow
 Furniture Feature Friday at Miss Mustard Seed
What's it Wednesday at Ivy and Elephants


Sunday, February 15, 2015

Art with Dimension, Purpose and Old World French Style!


Old wooden silverware boxes make great canvases for playing with artistic finishes. They can
generally be found at estate sales or thrift stores and once completed, you have a one-of-a-kind work of art that doubles as useful storage!

Consider layering several techniques to create a finish with plenty of depth and interest. Do
you love an Old World look with French flair? Let’s walk through the layers of art finishes
used to create the weathered French Postcard look on this old wooden silverware box.


This box was first painted with 2 coats of Old White. The script used for the background can
be found here . The image was emailed to an office supply store with the request
that it be printed in reverse, on a laser jet printer with specific dimensions to fit the lid of the
silverware box. With the white border cut away, the image was ready to be applied to the
painted box. For a more rustic effect, the Transfer Gel was brushed onto the lid of the box
with a crisscross motion as opposed to a smooth application. The image was then applied,
face down onto the wet gel and any wrinkles or bubbles were gently smoothed away.


After having dried overnight. It was time to remove the paper fibers and reveal the transferred
image. The paper was dampened with a kitchen sponge and rubbed away, not being too
careful to preserve every bit of the transferred image, as the rough spots only added to the
rustic finish. In fact, heavier rubbing around the edges of the piece helped eliminate the clean
edges and enhance the old world appearance of the French letter.


With the background in place, it was time to add dimension to the piece with a raised stencil
and Artisan Enhancements Fine Stone. Fine Stone is a plaster product with aggregate
texture and has no odor or harmful chemicals so it’s safe create with indoors along with all of
Artisan Enhancements art finishes and sealers. The Paris France stencil, also from Artisan
Enhancements was set in place and the fine stone was troweled over-top using the color
shaping tool. As soon as the stencil was covered, it was lifted straight up from the surface to
reveal the raised image on the box lid. The excess Fine Stone was scraped off the stencil
with the color shaper and returned to the container for future use.


Once the Fine Stone had completely dried, Scumble, a tintable glaze-like medium was mixed 5:1 first with Coco and Burgundy and applied just to the raised stencil relief. After being brushed on generously, the glaze was carefully wiped away with a damp sea sponge.


A second tinted Scumble glaze was then applied with a mix of 5 parts Scumble to 1 part
Graphite. This glaze was also applied to the entire box and then wiped away for a subtle aging effect.


Once the Scumble had dried, the stencil was laid back down over the relief and Old White was stippled on with a stencil brush to further highlight the design.


The result was a weathered, raised Paris, France passport stamp with just the right amount of
shadowing created with layers of tinted Scumble glaze, highlighted with Old White.


The Fine Stone Stencil Relief added a special artistic touch to the aged French letter and
dimensional quality that looks complicated but was actually very easy to do!


A thin layer of Clear Topcoat Sealer by Artisan Enhancements was brushed over the completed art finish. Twenty four hours later a second coat was applied for optimum protection. Clear Topcoat Sealer is an eco-friendly, high quality sealer that dries to a protective, clear matte finish.

What was once a discarded, boring brown box is now a beautiful piece of art to hold special letters and photos or maybe to sit on the coffee table for storing remote controls. Take this idea and run with it! The possibilities are endless with Artisan Enhancements and with eco-friendly products, you can create a masterpiece in the comfort of your home without exposing yourself, your family or the environment to harmful chemicals!

Disclosure: This is an Artisan Enhancements sponsored post, however the opinions and ideas expressed here are mine and I will only ever promote products that I enjoy using and feel may benefit my readers.

Thank you so much for your sweet visit!

Happy creating!

Best Wishes and Blessings,
Amanda


Sharing With:
Home Sweet Home at The Charm of Home
Feathered Nest Friday at French Country Home
Show and Tell Friday at My Romantic Home
Treasure Hunt Thursday at From My Front Porch To Yours
 Friday's Unfolded at Nancherrow
What's it Wednesday at Ivy and Elephants