Showing posts with label decorating. Show all posts

Tuesday, April 19, 2016

Subtle Details...A Vintage Buffet Makeover


Last week this lovely little vintage buffet made her way into my booth at Camas Antiques!  I was putting the finishing touches on her just moments before this photo was taken!  It was kind of a mad dash to get her to the shop, so I didn't quite get as many photos as I would have liked to!


When I picked her up, she was sturdy, clean and had great hardware but she was dark oak and I envisioned a much lighter, brighter look for her.


I mixed Old White and Pure White to create the color Annie Sloan calls "Original."

On the doors I applied a raised stencil relief using Artisan Enhancements VP Antico and their Fleur with Laurel and Crown stencil!  If you're interested in learning more about the raised stencil relief, please visit this blog post where I have described the technique in detail and shared a time lapse video of the process.  Normally I jazz up the relief with foils or glazes but I decided to keep it simple and subtle this time...just a hint of French elegance.

I did go over the entire piece with a light French Linen Wash and a little Old Ochre in select areas.  Unfortunately it was hard to capture in photos the subtle depth that these washes created.


On the inside I painted a pretty grey-blue.  It was a color I had mixed some time ago and had just enough left over to complete the interior.  I'm afraid I didn't make note of the color ratios...I am just not that organized!  If I had to guess, I would say it was a mix of Louis Blue and Paris Grey.


Rhododendrons, our state flower but not my favorite.  I enjoyed this one from our front yard during the short time it was a pretty pink this year


There she is...perfectly snug in my little booth, awaiting a new home!  Tomorrow the booth gets an overhaul...ready or not!  Follow me on Facebook for the reveal!

Thank you so much for your sweet visit!

Best Wishes and Blessings,
Amanda


Sharing With:
Home Sweet Home at The Charm of Home
Feathered Nest Friday at French Country Home
Show and Tell Friday at My Romantic Home


Saturday, February 8, 2014

Mini Makeovers for a Dresser Top Vignette

After braving the winter blizzard with the kiddos for a bit of sledding this morning, I am so happy to be inside by the fire, sitting at the computer with a cup of nice hot coffee!

A few weeks ago I shared the vintage dresser that I painted for my husband, as part of our master bedroom update.  I was struggling with how to decorate the top of it.  It's a large dresser and we have vaulted ceilings so there was a lot of space to fill.  I knew I wanted something substantial up there, but I wanted it to be special too! 


A couple of years ago my grandma gave me this sweet little cabinet.  As adorable as it is, the story behind it is what makes it so dear to me.  You can read more about it here.

Ever since the day I brought it home, I have been moving it from room to room trying to find the perfect spot for it.  I stuck it up on the dresser one day and thought it almost worked, but wasn't quite right.  I liked the natural look of the distressed wood but it wasn't flowing with the rest of our décor.  Last week I painted it Old White, with the interior in Paloma followed by a bit of distressing and both clear and dark wax.


Now this darling little cabinet has a sweet new look and a special spot in our room.  I love that it is finally in a place where we can enjoy and use it!


I just purchased the lovely gold crown from a friend's booth at Camas Antiques!  I thought it would be a fun accessory for our bedroom but wasn't sure where or how I would use it when I first brought it home.  I am loving antique gold these days and the color of the crown coordinates so perfectly with the hardware on the little cabinet.


Yesterday this thrifted gold frame got a quick makeover.  I had a small jar of blue paint I had mixed a long time ago...I believe it was Aubusson, Old White and Paris Grey.  It was more than enough to cover the brassy gold frame.  I distressed it back to let some of the gold show through and waxed it with dark wax only. 

The crowned Cavalier was an image I had purchased from an Etsy seller long ago.  The pup in the drawing looks so much like our Cavalier, Basil and with the crown on his little head it was just too fitting of an image to frame for this vignette!


I am really happy with how things are coming together!  I am a firm believer in decorating with pieces that you love.  If a piece doesn't work quite right, tweak it, paint it, reposition it, repurpose it!  If you love it enough, you will find a way to make it work!


I can't wait to show my grandma her little cabinet's new look!  I know she will be happy to see that it is being treasured!


Thank you for your sweet visit today!  Stay warm! 
Best Wishes and Blessings,
Amanda


Sharing with:

Make it Pretty Monday at The Decorated House
Home Sweet Home at The Charm of Home
Feathered Nest Friday at French Country Home
Inspiration Gallery at Craftberry Bush
Show and Tell Friday at My Romantic Home
Furniture Feature Friday at Miss Mustard Seed
Treasure Hunt Thursday at From My Front Porch To Yours
What's it Wednesday at Elephants and Ivy
Vintage Inspiration Friday at Common Ground 
 Wow us Wednesday at Savvy Southern Style

Tuesday, January 28, 2014

A New Look for My Vintage Dresser


Thirteen years ago, my husband and I, newly married purchased our first home and set out to furnish it on a very limited budget.  I headed straight to the local antique store (before Camas Antiques was around!) and bought two dressers for $100.  The pretty one with the mirror would be mine, of course, only it wasn't very pretty when I first spotted it.  Old mustard yellow paint was flaking off in places to reveal a shiny black layer underneath.  Nevertheless, it had potential and I figured I was capable of making it over!  I didn't have much experience painting furniture, but I had seen every episode of Trading Spaces on TLC, so I felt pretty confident that I was ready to tackle a furniture makeover! 

Paint one coat of white latex paint on, wait several hours for it to dry, a second coat, next day, a third coat...still see mustard yellow in places, a fourth coat, replace plain wood knobs with clear glass ones, and done!  I had myself a shiny white dresser. 

And so it remained for many years.  I vowed to repaint the white beast when we moved to our new home three years later, but got busy hunting for more furniture, having babies, starting a business, etc...  Fast forward many years later,  I have this wonderful paint sitting in the garage that I know will make my dresser a gazillion times more beautiful than that first mediocre paint job so long ago!


I started dreaming up a plan for this dresser that had faithfully held my things for so long, yet been so terribly neglected and under appreciated.  It started with a complete coat of Paloma Chalk Paint® Decorative Paint by Annie Sloan.  Once that coat had dried (about 15 minutes later!), I applied a little Artisan Enhancements Crackle Tex here and there, and then waited for that to dry. 


The interior and drawer sides I painted Paloma were simply clear waxed.  It makes for a lovely surprise when the drawer is opened, and I am enjoying seeing the pretty color inside when I open it to grab a pair of leggings or a camisole.


After doing some strategic distressing to reveal that lovely lavender shade beneath the white, I stenciled a flourish pattern across the drawer fronts, also in Paloma.  Next, I heavily distressed my stenciling to make it look as though it had been there for ages.

Finally, I waxed the entire dresser first with Annie Sloan's clear wax, followed by dark wax and then the clear again where I wanted to lighten it up a bit.


Today, I had fun accessorizing and staging my old dresser with it's new look, in a new spot in our bedroom!  I purchased this violets print on Ebay for our bedroom years ago.  Today it was put in a new frame and I think it's perfect on top of the dresser as it breaks up the big square mirror.


This antique sterling hand mirror and brush set was a wonderful bargain at a garage sale a couple of summers ago.


My Eiffel tower statues frequently move around to different parts of the house and are often used in staging furniture for photos.  I think I will enjoy them here for while!


I'll let you in on a little secret of mine.  When I shop estate sales for treasures for my antique store booth space, I often come home with items that are flawed beyond repair and in my mind not suitable for resale.  Most of the time, it's simply oversight.  I get in a rush and forget to look over my purchases carefully before checking out.  I sometimes end up tossing these items or donating them to a local thrift store, as much as I hate to do so having just dished out my hard earned money for them.  But, whenever I can I find a place in our home to use these items, either in a repurposing project, or just to put on display.  This tea cup is one of those items...cracked all the way through and poorly glued back together but still much too beautiful to be thrown away.  It's unsuitable for tea, but it could sure hold a few pair of earrings!


I purchased some silk lavender at the craft store last week to use in my bedroom but when I put it out, it seemed too bright and new next to all of my vintage lovelies.  Last summer my husband and I celebrated our anniversary in Hood River and enjoyed a visit to a beautiful lavender farm.  The bunch of lavender that I picked that day has dried nicely and is the perfect shade of dusty purple to sit atop my lovely dresser...and it holds a special memory as well. 


I am still working on a few more updates to our bedroom but feel like I am fairly close to being ready to share photos of the whole room.  I have a small wish list, a few items that would really pull the room together and make it feel a bit more complete.  This weekend is the Funky Junk Sisters Vintage Flea Market in Hillsboro, Oregon where there is sure to be a plethora of vintage goodies for sale!  I am so looking forward to a shopping trip with a couple of my favorite vintage loving buddies!  Hopefully I will find those perfect accessories I've been in search of! 
Be sure to follow me on Facebook for photos from our Flea Market adventure!

Thank you so much for your sweet visit today!  Have a wonderful week!

Best Wishes and Blessings,
Amanda


Sharing with...
Home Sweet Home at The Charm of Home
Feathered Nest Friday at French Country Home
Show and Tell Friday at My Romantic Home
Furniture Feature Friday at Miss Mustard Seed
Treasure Hunt Thursday at From My Front Porch To Yours
What's it Wednesday at Elephants and Ivy
Vintage Inspiration Friday at Common Ground 
 Wow us Wednesday at Savvy Southern Style
Make it Pretty Monday at The Dedicated House

Tuesday, May 8, 2012

How to Transfer Quotes onto Fabric Quickly and Easily!


I can't tell you how many people have asked me how I wrote the quotes on the painter's canvas drop cloth for the Jane Austen inspired window display.  I am afraid you won't be quite so impressed when you hear just how easy it is to do!  For me, the most difficult part was figuring the logistics of getting what I wanted, the size I needed, printed onto paper.  I am not a computer whiz.  I hope I can explain this clearly for you!

The font I used for my Jane Austen quotes was a free download from www.dafont.com.  I was so excited to find this font, based on Jane Austen's own handwriting!  I just love it!  There are so many fabulous fonts on this site.  A friend of mine who is a graphics designer turned me onto it and I have to admit that I have spent a little too much time perusing all of the great options.  Downloading fonts from this site to your computer can be a little tricky, unless you're technologically minded (not me!)  Look around the site though and you will find detailed instructions for your specific computer.  Of course you can also just use a font that you already have!


The program I used to type up my quotes is "Paint."  I think everyone has this program on their computer.  It seems to come standard, at least with PCs.  So, I typed up my Jane Austen quote, just the way I wanted it, in her hand written script in the "Paint" program.  I will describe the next few steps the way they looked with the version of "Paint" that I have.  If you have a different version, it may look a little different but I think you should still be able to find the right tabs to make it work.

1.  Click on the far left drop-down box (mine doesn't have a title, just an image that looks like a page of paper with lines on it).
2.  Go down to "Print" and move your mouse over to the right where another menu pops up with the options:  print, page setup, and print preview.  Choose "Page Setup."
3.  Select "Fit to" and enter the number of pages you want your quote to print on.  For example 3 and 2 will print your quote onto 6 pages.  You may have to play with this a bit before you get it just how you want it.
4.  After you select "okay," the window will go away.  You will then go back up to that drop down menu and select "print."  Make sure you print "all pages."  Keep in mind that some of your pages will probably be blank.  When you lay out your quote, you will see why!

I'd like to mention here that I once read about a website that does all of this work for you for free (if I understood it correctly).  I cannot seem to remember what the site was called or figure out where to find it, but if you know and would be kind enough to share it with me, I will post it here!


Once I had my quote printed the way I wanted, I had to cut some of the margins with my paper cutter in order line up the words just right.  I taped the pages together and then taped the whole quote up onto my giant light box (a.k.a. sliding glass door!) 


Next, I taped the drop cloth directly over top of the quote using masking tape.  It really helps to have an extra set of hands here if you're doing a larger transfer, and unless you have a huge picture window, you may have to do one half at a time, which is tricky.  I recommend keeping your quotes small enough to fit in your window, as I did in the photo above.  This will make your life much easier!  Now, as long as there is sufficient light shining through your window (this doesn't work in the evening or on a really dark, cloudy day...trust me, I tried!) you should be able to see the script through your drop cloth really well.  I used a black permanent marker to copy the quote and wrote it right there on my window.  I tested a few times to make sure the marker wasn't going to bleed through onto the glass, and it didn't.  I recommend you test it out as well with the fabric you're using.  I know you don't want permanent marker on your windows!  If you're nervous about it, or are using a lighter weight fabric, you can trace the words in pencil, take your fabric down and then go over it with your permanent marker on another surface (one that you don't mind marking up or that is lined with something to stop the bleed through).


There you have it!  I really enjoyed writing out these quotes and have some other fun ideas for using my big sliding glass door light box!  I hope you'll give it a try!  I'd love to see what you do with this project idea!  The possibilities are endless!


 Thank you for your sweet visit today!  I hope you are having a fabulous week!

Best Wishes and Blessings,
Amanda


Sharing this post with these fun link parties:
White Wednesday at Faded Charm
Wow us Wednesdays at Savvy Southern Style
Open House Party at No Minimalist Here
Vintage Inspiration Friday at Common Ground
Home Sweet Home at The Charm of Home
Inspiration Friday at The Pickett Fence
Feathered Nest Friday at French Country Home
Show and Tell Friday at My Romantic Home
Fridays Unfolded at Stuff and Nonsense

Monday, May 7, 2012

Au Revoir to My Pretty Table and Chairs


The table and chair set that I painted for the Jane Austen Inspired Window has sold and will be leaving the store tomorrow.  I am so happy that they are going on to a new home where they will be loved but sometimes it's just so hard to say goodbye!


As you can see, I was really having fun with this set in our living room.  If I could have only justified having a third dining set in our house, right next to the dining room...  Hmm...it seems a little excessive.  But it really came in handy when I hosted a ladies' game night last month.  Unfortunately that only happens once a year.  So, this pretty little set is moving right along to her new home!


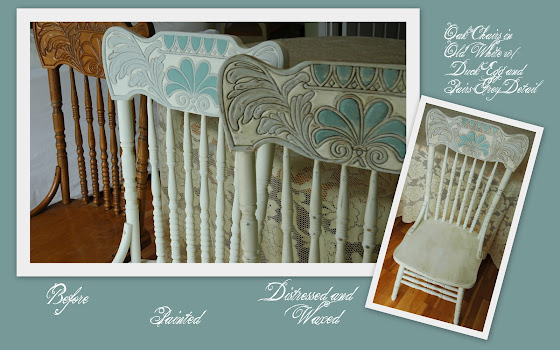
Here is a look at the progression of the chairs' transformation.  As always, I love how a little distressing and dark wax can add so much character to a chalk painted piece, especially one with lots of fun detail!


The colors I used here are Annie Sloan's Old White, Paris Grey and Duck Egg Blue. 


I thoroughly enjoyed painting the detail work on the chair backs.  It was all of those spindles that were so time consuming and monotonous.  This was one of those times when I wished I'd had a sprayer and a place to spray my furniture....just for all of those gazillion little spindles!


You can read more about the table sold with the set of chairs by following the link here.


Here is one more look at the dining set in it's home in the window.  Tomorrow, the scene will be a bit different.  I wish I had another beautiful painted set to put in it's place, but I am just not quite that prolific with my painting.  What I do have is a lovely old round, wood gate leg table.  I think it will work.  I hope to have a couple more pieces completed and worked into the display before the Mother's Day sidewalk sale on Saturday!  It will be a fun event, with coffee and cookies served and a free gift to the first 50 customers!  If you're in the area, please stop by! 
You are sure to find the perfect Mother's Day gift!

Thank you for your sweet visit!  I hope you are having a lovely day!

Best Wishes and Blessings,
Amanda


Sharing this post with these fun link parties:

White Wednesday at Faded Charm
Wow us Wednesdays at Savvy Southern Style
Open House Party at No Minimalist Here
Creative Things Thursday at The Vintage Farmhouse
Home Sweet Home at The Charm of Home
Vintage Inspiration Friday at Common Ground
Feathered Nest Friday at French Country Home
Show and Tell Friday at My Romantic Home
Furniture Feature Friday with Miss Mustard Seed
Friday Feature Party at Redoux Interiors

Thursday, April 12, 2012

Art Deco Darling to English Cottage Chic!


The entire Annie Sloan workshop experience was a thrill for me, but I would have to say that the highlight was having the opportunity to pick Annie's brain about a window display I am working on for Camas Antiques.  I have been busily squirreling away special furniture pieces in preparation for this large window display that I will be putting together for the month of May!  My inspiration is Jane Austen and of course everything from mirrors to chairs will be painted in ASCP. 

When I shared my project ideas with Annie and asked for her thoughts on what colors would best represent the English countryside of the 1800's, her eyes sparkled and she enthusiastically spouted off a long list of lovely colors!  I wish I could have recorded our conversation.  I jotted down notes as quickly as I could but I couldn't capture in writing the passion and excitement in Annie's voice as she shared her ideas with me!  It seems I had struck a chord with Annie when I mentioned Jane Austen!  Annie shared with me that many of her chalk paint colors were inspired by the fine art of 19th Century, and of course she was a great fan of Jane Austen novels and movies as well!

I was considering not posting about my project with you until my display was all put together, but I am so focused on pieces for the window right now that I probably wouldn't have anything else to post about this month if I didn't!  So, I've decided to take you on this journey with me.  For the next couple of weeks I will be sharing furniture makeovers and vignettes that will come together during the first week of May for my Jane Austen inspired window!

This lovely cupboard has been in progress for weeks now but it is finally completed and will be hanging out in my dining room for the rest of the month!  I am trying not to get too used to it...but it looks so lovely in my home! 
If you are a lover of wood grain, don't flinch!  That is not solid mahogany...just a veneer!


The decorative wood inlays were broken in several places, so I didn't feel too guilty about removing them.  They gave the cupboard a formal art deco feel, as did the flame mahogany looking veneer.  Not that there is anything unappealing about art deco...it's just not the look I was going for with my Jane Austen theme!  The scalloped bottom of this piece is what inspired me to take it to cottage chic with old English appeal!  I like to think that it could have come right out of the dining room of one Ms. Elizabeth Bennett. 


I used one of my favorite finishes for this lovely piece.  I started with an all over coat in Old White with short, varied, uneven brush strokes, followed by one coat in Paris Grey with the same method.  Next, I distressed with a fine grit sanding sponge.  Annie Sloan prefers using small pieces of sand paper and does her distressing after a coat of clear wax is applied.  Sanding before waxing is definitely messier, but I like how easily the chalk paint distresses before it's waxed.  I also feel like a sanding sponge is easier to handle than a piece of sand paper.  This is just my preference for working on a larger piece of furniture.  I completed the cupboard with Annie's clear and dark waxes.


Are you a chalkaholic?  Whether you're just getting started, still contemplating a chalk paint purchase or you've been using Annie Sloan's products since the very beginning, I invite you to follow my "Paint it Annie" chalk paint inspiration board on Pinterest!  I may have even featured one of your own chalk paint projects!  I created this board long before I started using ASCP.  Seeing the colors on actual pieces of furniture really helped me decide which ones I wanted to get started with!  I continue to be amazed and inspired by all of the fabulous makeovers out there in blogland! 
Keep up the wonderful work!

And now, I must go grab some lunch and get back to work myself!  I have so many projects to complete over the next couple of weeks!  I hope you are having a wonderful day! 
Thank you so much for your sweet visit!

Best Wishes and Blessings,
Amanda


I will be joining in on these fun parties!
Wow us Wednesday at Savvy Southern Style
What's it Wednesday at Ivy and Elephants
Creative Things Thursday at The Vintage Farmhouse
Home Sweet Home at The Charm of Home
Vintage Inspiration Friday at Common Ground
Feathered Nest Friday at French Country Home
Show and Tell Friday at My Romantic Home
Furniture Feature Friday with Miss Mustard Seed
Friday Feature Party at Redoux Interiors

Tuesday, April 3, 2012

A Balancing Act and a Table Makeover


I didn't do a lot of painting last week and I didn't do a lot of blogging either.  My excuse...I had to clean my house for guests!  I don't know about you, but if one area of my life is organized and productive, another suffers.  I am learning to accept that and just do the best that I can!


If you walk into my house and the living room is clean, be assured that the beds are not made and I probably have piles of laundry on my bedroom floor waiting to be folded and put away.  If my space at the antique mall is fully stocked with freshly painted pieces, then I probably have a sink full of dirty dishes at home and I most likely haven't washed my hair in 3 days! 

So, I just wanted to say to you, my readers and friends that my world is happy, but far from perfect!  If you see a picture of a room in my house and everything looks neat and tidy, know that I was busily tidying up and "staging" just for that photo.  Chances are that the rest of my house is in disarray, and that's okay! 
Now, onto the makeover!  By the way, this was completed 2 weeks ago...before I started cleaning house!


Presently, this table is in my living room but I am working on a set of chairs that I think will join it at the shop next month!  In the meantime, it's a great place to set up Monopoly Golf.  I should have left the game sprawled out on the table top for this photo, instead of tidying up and staging!  I didn't know where this post was going until I sat down to write it!


These close-up shots really exaggerate and demonstrate the effect of the waxing.  I think it's interesting, and helpful to see especially what the dark wax does to the finish.


To achieve this finish, I used short, varied brush strokes instead of the traditional long, back and forth painting method.  This is Annie Sloan's method for an old world paint finish.  I loved watching Annie paint at the workshop I attended.  Of course she makes it look absolutely effortless.  I am still working on getting that perfectly imperfect old patina.  I played with a few variations of Paris Grey and Old White on the table top which gave it almost a marbled look...not what I had in mind exactly, but I like it!


Something that Annie talked about at the workshop was the importance of allowing the wax to cure, specifically on a table top before it is heavily used.  She admitted that her own dining table has her son's signiture imprinted on it because he sat down to sign a paper just a day or two after she had finished waxing it!  I think this is a good tip to keep in mind.  I've had a table cloth on this table and it's really only been used for board games.  The finish is holding up great but I am happy to give it time to fully cure before I take it to the shop and cover it with vintage treasures!


Thank you for your sweet visit!  I hope you are having a fabulous week!  I am back to painting, and my house is no longer clean.  Se la vie!

Best Wishes and Blessings,
Amanda


I will be joining in on these fun parties!
Wow us Wednesday at Savvy Southern Style
What's it Wednesday at Ivy and Elephants
Creative Things Thursday at The Vintage Farmhouse
Home Sweet Home at The Charm of Home
Vintage Inspiration Friday at Common Ground
Feathered Nest Friday at French Country Home
Show and Tell Friday at My Romantic Home
Furniture Feature Friday with Miss Mustard Seed